Review
doi: 10.1016/j.jhsa.2010.06.024.
Zone II combined flexor digitorum superficialis and flexor digitorum profundus repair distal to the A2 pulley
Affiliations
- PMID: 20807631
- PMCID: PMC2935297
- DOI: 10.1016/j.jhsa.2010.06.024
Item in Clipboard
Review
Zone II combined flexor digitorum superficialis and flexor digitorum profundus repair distal to the A2 pulley
J Hand Surg Am.
2010 Sep.
No abstract available
Figures
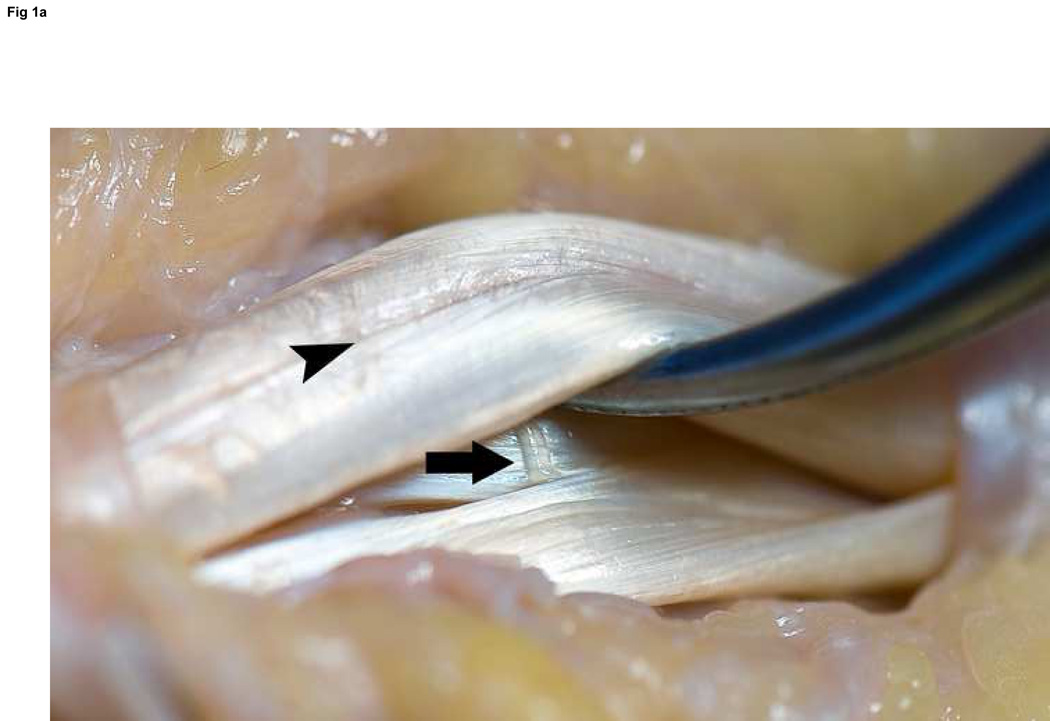
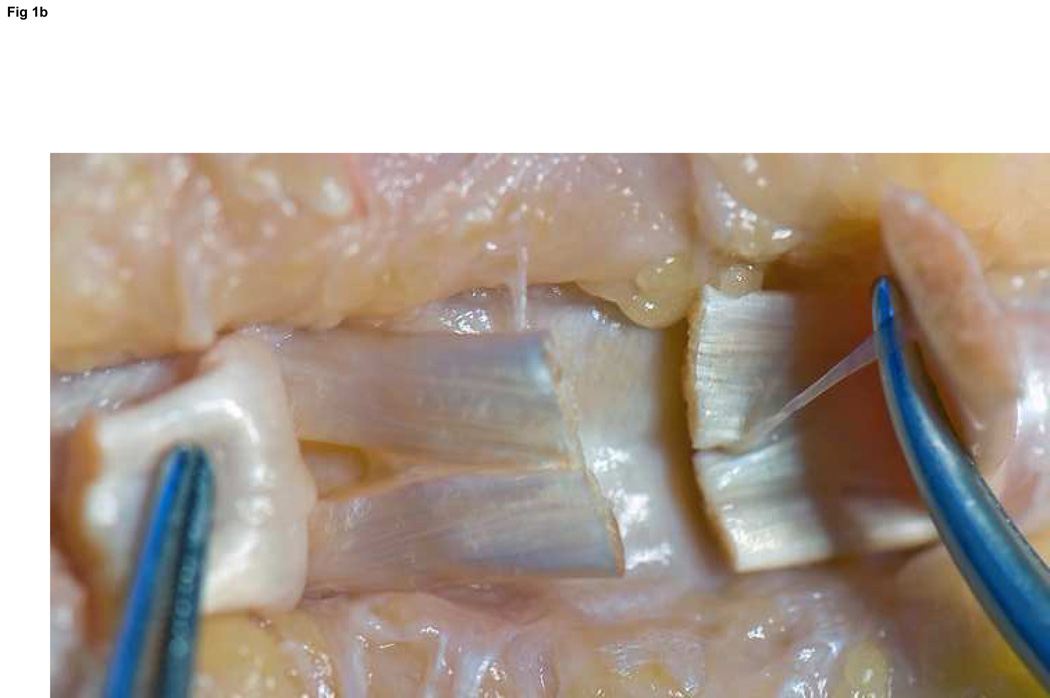
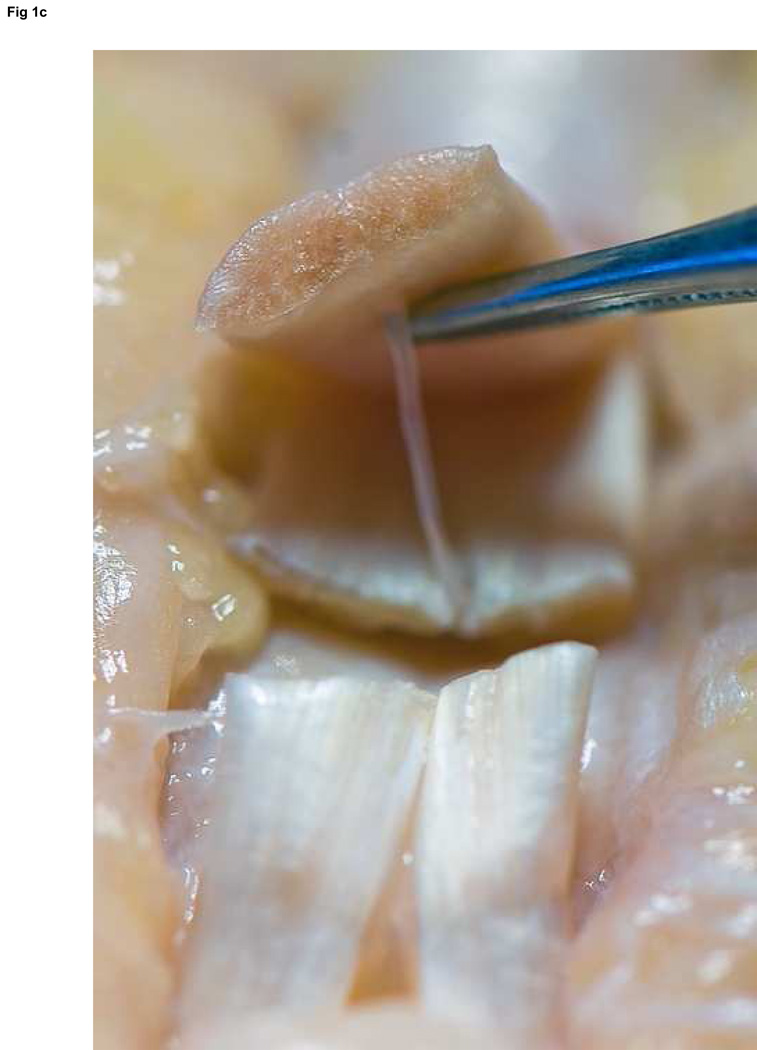
A: Oblique view without laceration; note the vinculum longus profundus emerging just distal to the FDS decussation (arrow) and the radial and ulnar bundles of the FDP tendon clearly marked by the longitudinal groove between them (arrowhead). B: Volar perspective after laceration. C: Axial perspective demonstrating the ovoid shape of the FDP tendon, and the flat shape to the FDS slips.
A: Oblique view without laceration; note the vinculum longus profundus emerging just distal to the FDS decussation (arrow) and the radial and ulnar bundles of the FDP tendon clearly marked by the longitudinal groove between them (arrowhead). B: Volar perspective after laceration. C: Axial perspective demonstrating the ovoid shape of the FDP tendon, and the flat shape to the FDS slips.
A: Oblique view without laceration; note the vinculum longus profundus emerging just distal to the FDS decussation (arrow) and the radial and ulnar bundles of the FDP tendon clearly marked by the longitudinal groove between them (arrowhead). B: Volar perspective after laceration. C: Axial perspective demonstrating the ovoid shape of the FDP tendon, and the flat shape to the FDS slips.

Becker suture of the ulnar one-half of an FDS slip using 5-0 Prolene. This is repeated for each half of FDS slips on both sides of the laceration. This allows for a four-strand repair of each slip.
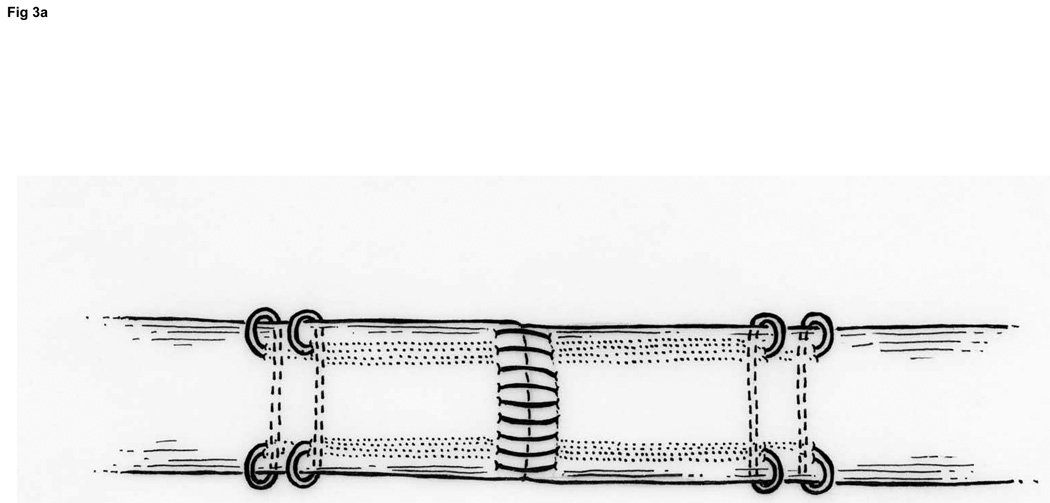
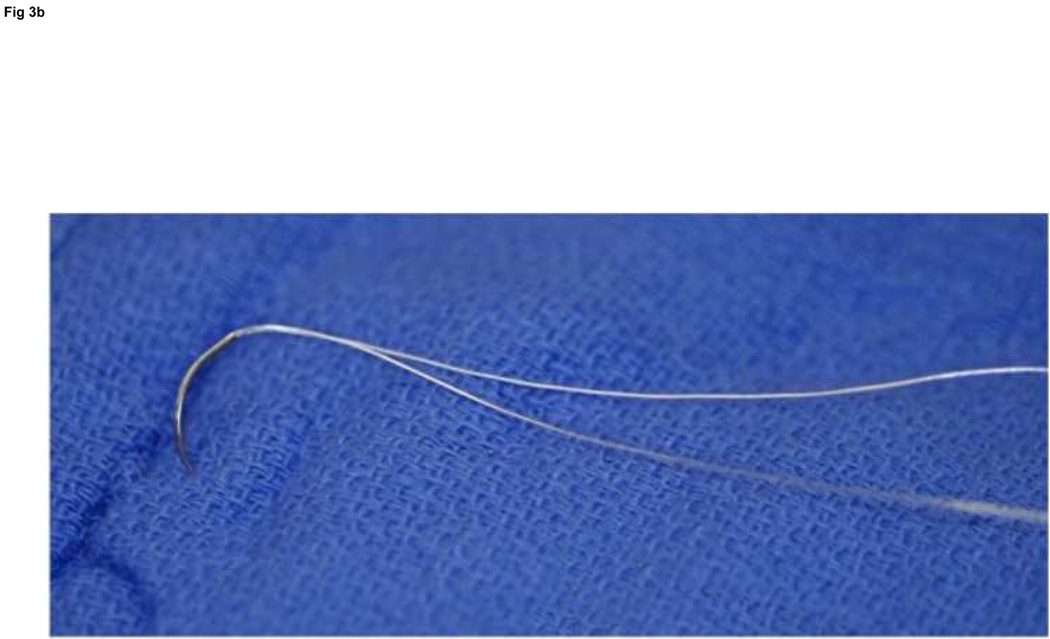
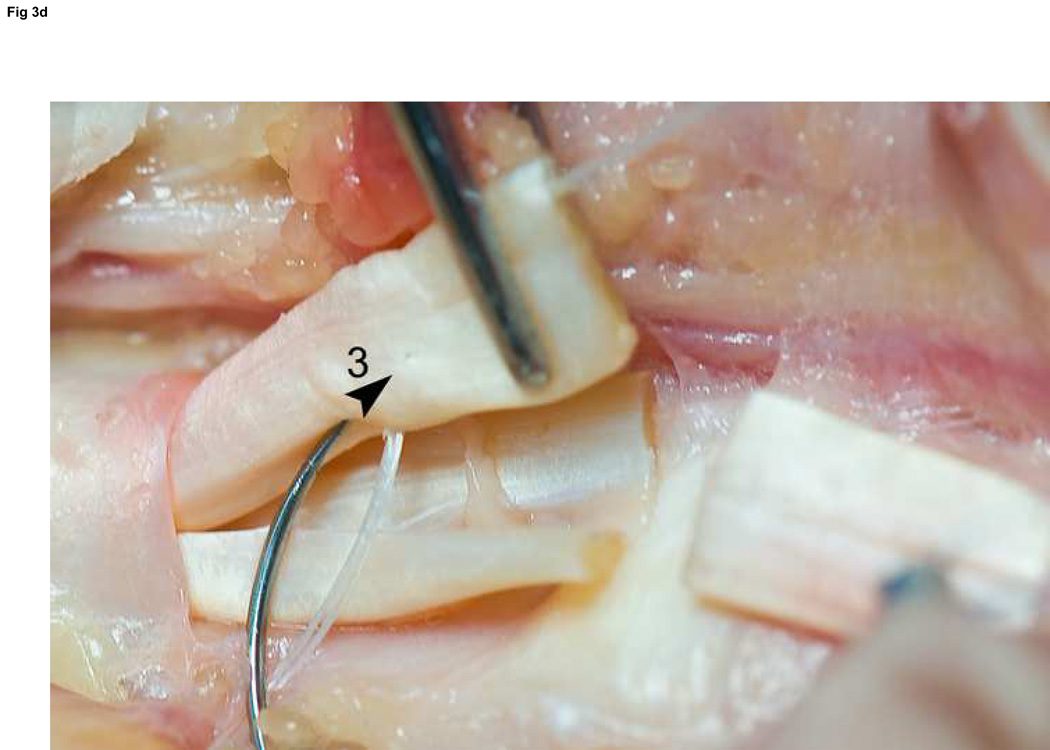
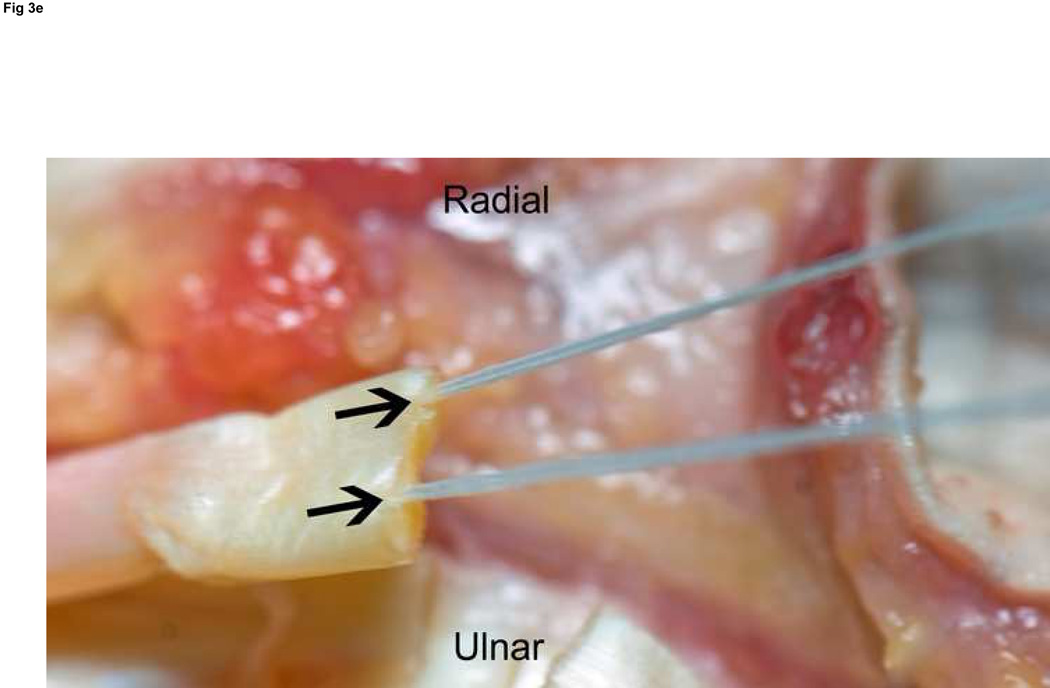
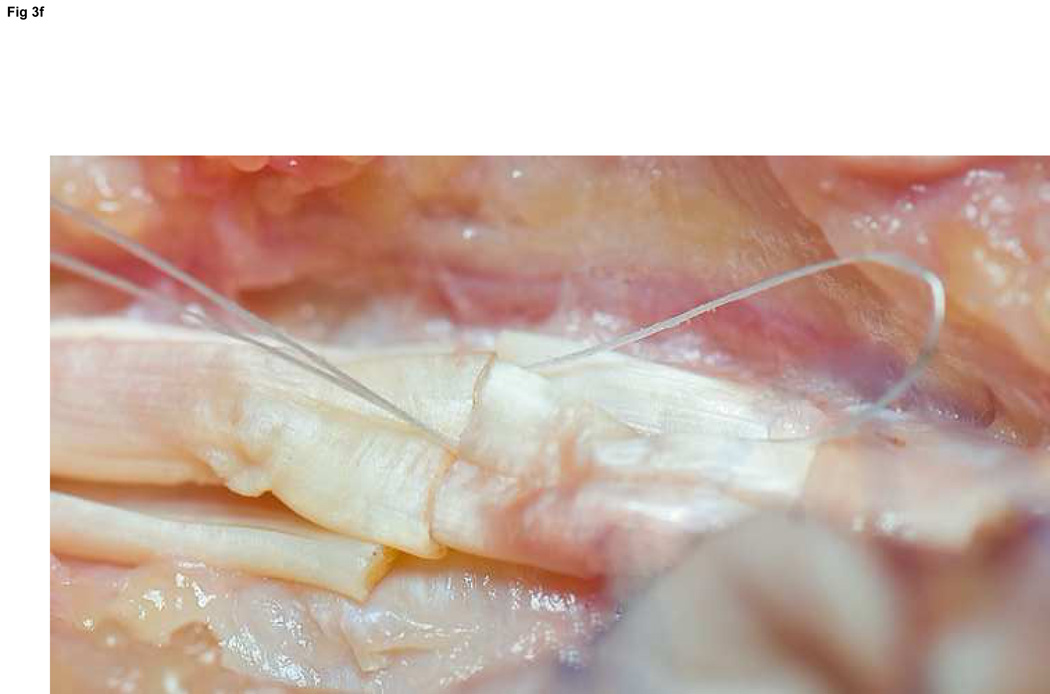
A: Diagram depicting final repair and suture configuration. B: 4-0 looped Supramid suture. C: The initial pass is placed with a purchase length of 1.2 cm (arrowhead ‘1’); placement of transverse pass closer to lacerated tendon end to create a locking loop (arrowhead ‘2’). D: The third pass enters further from the lacerated end than the transverse pass to create a second locking loop (arrowhead ‘3’). The same passes are performed on the opposite tendon end to complete the first sequence of passes (4 strands now cross the repair site). E: Note that the suture limbs are exiting the radial and ulnar bundles of the tendon from their radial aspects (arrows); the second sequence of passes will utilize the ulnar half of the bundles to complete the 8-strand repair. F: Once the first sequence of passes is completed for the other tendon end, the ends are gently approximated to avoid ‘locking’ the ends apart prior to knot-tying.
A: Diagram depicting final repair and suture configuration. B: 4-0 looped Supramid suture. C: The initial pass is placed with a purchase length of 1.2 cm (arrowhead ‘1’); placement of transverse pass closer to lacerated tendon end to create a locking loop (arrowhead ‘2’). D: The third pass enters further from the lacerated end than the transverse pass to create a second locking loop (arrowhead ‘3’). The same passes are performed on the opposite tendon end to complete the first sequence of passes (4 strands now cross the repair site). E: Note that the suture limbs are exiting the radial and ulnar bundles of the tendon from their radial aspects (arrows); the second sequence of passes will utilize the ulnar half of the bundles to complete the 8-strand repair. F: Once the first sequence of passes is completed for the other tendon end, the ends are gently approximated to avoid ‘locking’ the ends apart prior to knot-tying.

A: Diagram depicting final repair and suture configuration. B: 4-0 looped Supramid suture. C: The initial pass is placed with a purchase length of 1.2 cm (arrowhead ‘1’); placement of transverse pass closer to lacerated tendon end to create a locking loop (arrowhead ‘2’). D: The third pass enters further from the lacerated end than the transverse pass to create a second locking loop (arrowhead ‘3’). The same passes are performed on the opposite tendon end to complete the first sequence of passes (4 strands now cross the repair site). E: Note that the suture limbs are exiting the radial and ulnar bundles of the tendon from their radial aspects (arrows); the second sequence of passes will utilize the ulnar half of the bundles to complete the 8-strand repair. F: Once the first sequence of passes is completed for the other tendon end, the ends are gently approximated to avoid ‘locking’ the ends apart prior to knot-tying.
A: Diagram depicting final repair and suture configuration. B: 4-0 looped Supramid suture. C: The initial pass is placed with a purchase length of 1.2 cm (arrowhead ‘1’); placement of transverse pass closer to lacerated tendon end to create a locking loop (arrowhead ‘2’). D: The third pass enters further from the lacerated end than the transverse pass to create a second locking loop (arrowhead ‘3’). The same passes are performed on the opposite tendon end to complete the first sequence of passes (4 strands now cross the repair site). E: Note that the suture limbs are exiting the radial and ulnar bundles of the tendon from their radial aspects (arrows); the second sequence of passes will utilize the ulnar half of the bundles to complete the 8-strand repair. F: Once the first sequence of passes is completed for the other tendon end, the ends are gently approximated to avoid ‘locking’ the ends apart prior to knot-tying.
A: Diagram depicting final repair and suture configuration. B: 4-0 looped Supramid suture. C: The initial pass is placed with a purchase length of 1.2 cm (arrowhead ‘1’); placement of transverse pass closer to lacerated tendon end to create a locking loop (arrowhead ‘2’). D: The third pass enters further from the lacerated end than the transverse pass to create a second locking loop (arrowhead ‘3’). The same passes are performed on the opposite tendon end to complete the first sequence of passes (4 strands now cross the repair site). E: Note that the suture limbs are exiting the radial and ulnar bundles of the tendon from their radial aspects (arrows); the second sequence of passes will utilize the ulnar half of the bundles to complete the 8-strand repair. F: Once the first sequence of passes is completed for the other tendon end, the ends are gently approximated to avoid ‘locking’ the ends apart prior to knot-tying.
A: Diagram depicting final repair and suture configuration. B: 4-0 looped Supramid suture. C: The initial pass is placed with a purchase length of 1.2 cm (arrowhead ‘1’); placement of transverse pass closer to lacerated tendon end to create a locking loop (arrowhead ‘2’). D: The third pass enters further from the lacerated end than the transverse pass to create a second locking loop (arrowhead ‘3’). The same passes are performed on the opposite tendon end to complete the first sequence of passes (4 strands now cross the repair site). E: Note that the suture limbs are exiting the radial and ulnar bundles of the tendon from their radial aspects (arrows); the second sequence of passes will utilize the ulnar half of the bundles to complete the 8-strand repair. F: Once the first sequence of passes is completed for the other tendon end, the ends are gently approximated to avoid ‘locking’ the ends apart prior to knot-tying.
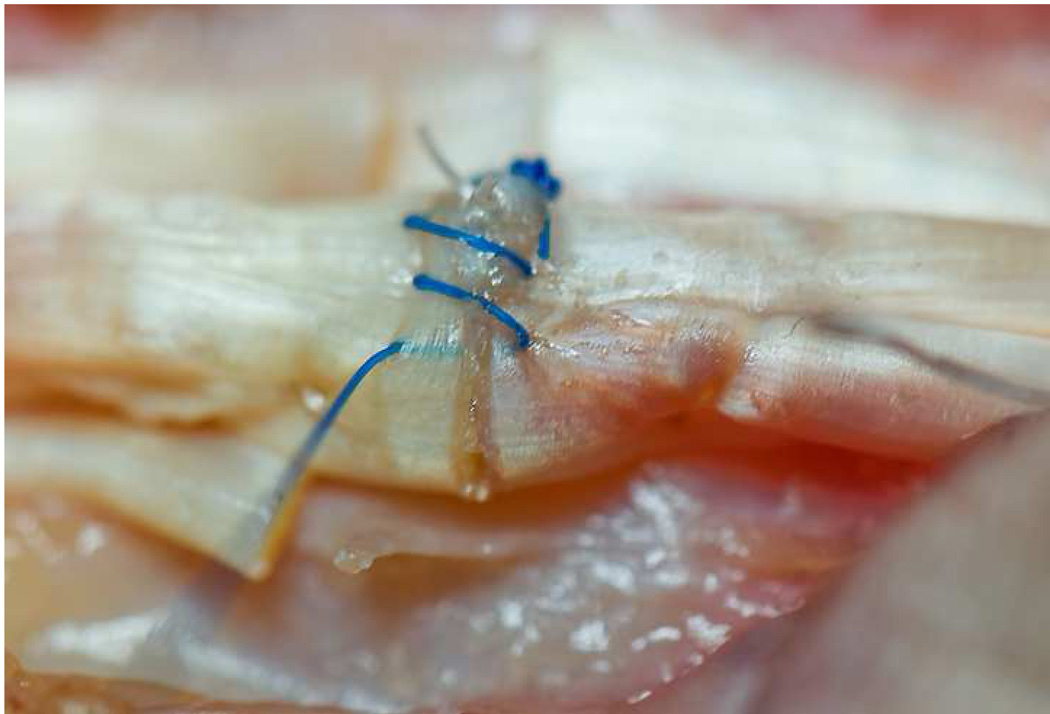
6-0 Prolene is used in a running fashion, 2 mm deep and 2 mm from the lacerated end to improve the strength of the repair and tidy the repair site. The single core suture knot can be seen in the background.
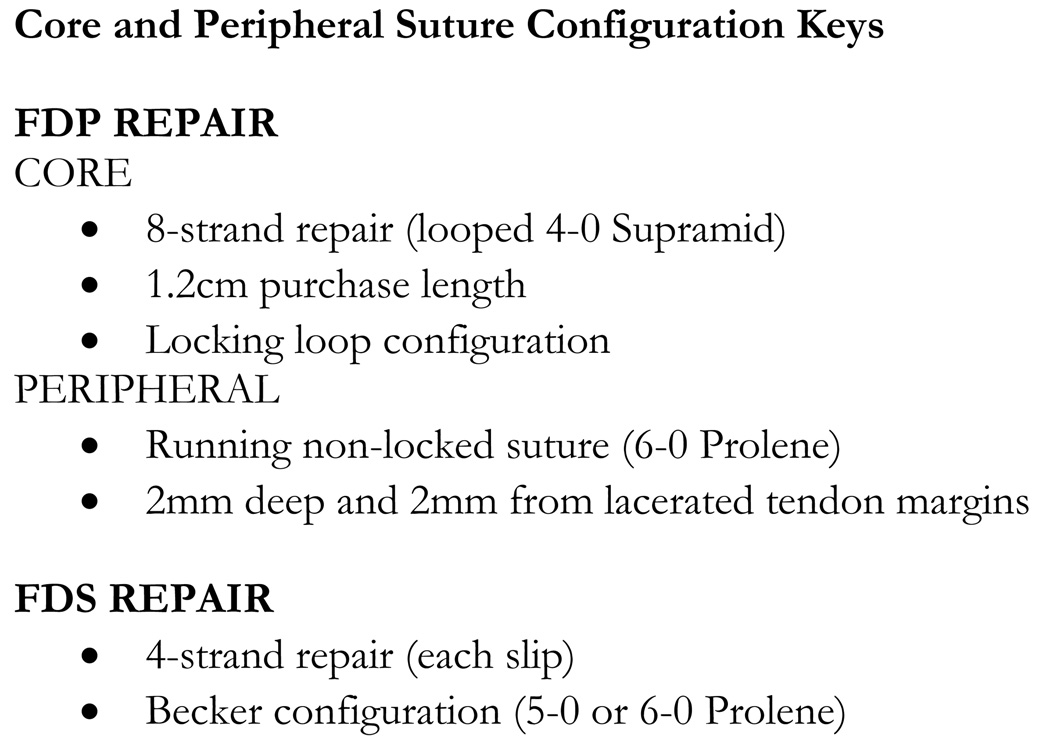
Key points for the core and peripheral suture configuration.
Similar articles
-
Flexor digitorum superficialis repair outside the A2 pulley after zone II laceration: gliding and bowstringing.J Hand Surg Am. 2015 Apr;40(4):653-9. doi: 10.1016/j.jhsa.2014.12.045. Epub 2015 Feb 24. J Hand Surg Am. 2015. PMID: 25721237 Free PMC article.
-
Closed rupture of both flexor digitorum profundus and superficialis tendons of the small finger in zone II: case report.J Hand Surg Am. 2011 Jan;36(1):121-4. doi: 10.1016/j.jhsa.2010.09.024. Epub 2010 Dec 13. J Hand Surg Am. 2011. PMID: 21146330
-
Work of flexion related to different suture materials after flexor digitorum profundus and flexor digitorum superficialis tendon repair in zone II: a biomechanical study.J Hand Surg Am. 2009 Apr;34(4):700-4. doi: 10.1016/j.jhsa.2008.12.003. J Hand Surg Am. 2009. PMID: 19345873 Clinical Trial.
-
Traumatic simultaneous rupture of both flexor tendons in a finger of an athlete.Am J Orthop (Belle Mead NJ). 2005 Oct;34(10):505-7. Am J Orthop (Belle Mead NJ). 2005. PMID: 16304800 Review.
-
Flexor Tendon Injuries.Clin Plast Surg. 2019 Jul;46(3):295-306. doi: 10.1016/j.cps.2019.02.003. Clin Plast Surg. 2019. PMID: 31103074 Review.
Cited by
-
Flexor tendon injuries.J Clin Orthop Trauma. 2019 Sep-Oct;10(5):853-861. doi: 10.1016/j.jcot.2019.08.005. Epub 2019 Aug 19. J Clin Orthop Trauma. 2019. PMID: 31528057 Free PMC article. Review.
-
Closed traumatic avulsion of both ring finger flexors with successful primary repair more than 4 weeks after injury and a review of the literature.J Surg Case Rep. 2020 Jul 14;2020(7):rjaa160. doi: 10.1093/jscr/rjaa160. eCollection 2020 Jul. J Surg Case Rep. 2020. PMID: 32699602 Free PMC article.
-
Morphological features of the chiasma tendinum and its relation with surface landmarks and pulleys: a cadaveric study.Surg Radiol Anat. 2021 Oct;43(10):1623-1633. doi: 10.1007/s00276-021-02783-w. Epub 2021 Jul 1. Surg Radiol Anat. 2021. PMID: 34196774 Free PMC article.
-
Location of the Cut Flexor Tendons in the Palm Using Surface Anatomy: A Simple Guide for Minimal Incision Surgery.World J Plast Surg. 2020 Sep;9(3):321-325. doi: 10.29252/wjps.9.3.321. World J Plast Surg. 2020. PMID: 33330010 Free PMC article.
-
Practice Patterns in Operative Flexor Tendon Laceration Repair: A 15-Year Analysis of Continuous Certification Data from the American Board of Plastic Surgery.Plast Reconstr Surg Glob Open. 2022 Oct 7;10(10):e4558. doi: 10.1097/GOX.0000000000004558. eCollection 2022 Oct. Plast Reconstr Surg Glob Open. 2022. PMID: 36225846 Free PMC article.
References
-
- Silverman PM, Gordon L. Early motion after replantation. Hand Clin. 1996;12:97–107. - PubMed
-
- Lundborg G, Myrhage R, Rydevik B. The vascularization of human flexor tendons within the digital synovial sheath region--structureal and functional aspects. J Hand Surg. 1977;2A:417–427. - PubMed
-
- Sourmelis SG, McGrouther DA. Retrieval of the retracted flexor tendon. Journal of hand surgery (Edinburgh, Scotland) 1987;12:109–111. - PubMed
-
- Miller L, Mass DP. A comparison of four repair techniques for Camper's chiasma flexor digitorum superficialis lacerations: tested in an in vitro model. J Hand Surg. 2000;25A:1122–1126. - PubMed
-
- Winters SC, Gelberman RH, Woo SL, Chan SS, Grewal R, Seiler JG., 3rd The effects of multiple-strand suture methods on the strength and excursion of repaired intrasynovial flexor tendons: a biomechanical study in dogs. J Hand Surg. 1998;23A:97–104. - PubMed
Publication types
MeSH terms
Grants and funding
LinkOut - more resources
Full Text Sources
Medical