. 2018 Aug 1;10(1):18.
doi: 10.1186/s13089-018-0098-z.

An easier and safe affair, pleural drainage with ultrasound in critical patient: a technical note

Affiliations

An easier and safe affair, pleural drainage with ultrasound in critical patient: a technical note

Luigi Vetrugno et al. Crit Ultrasound J. .

Abstract

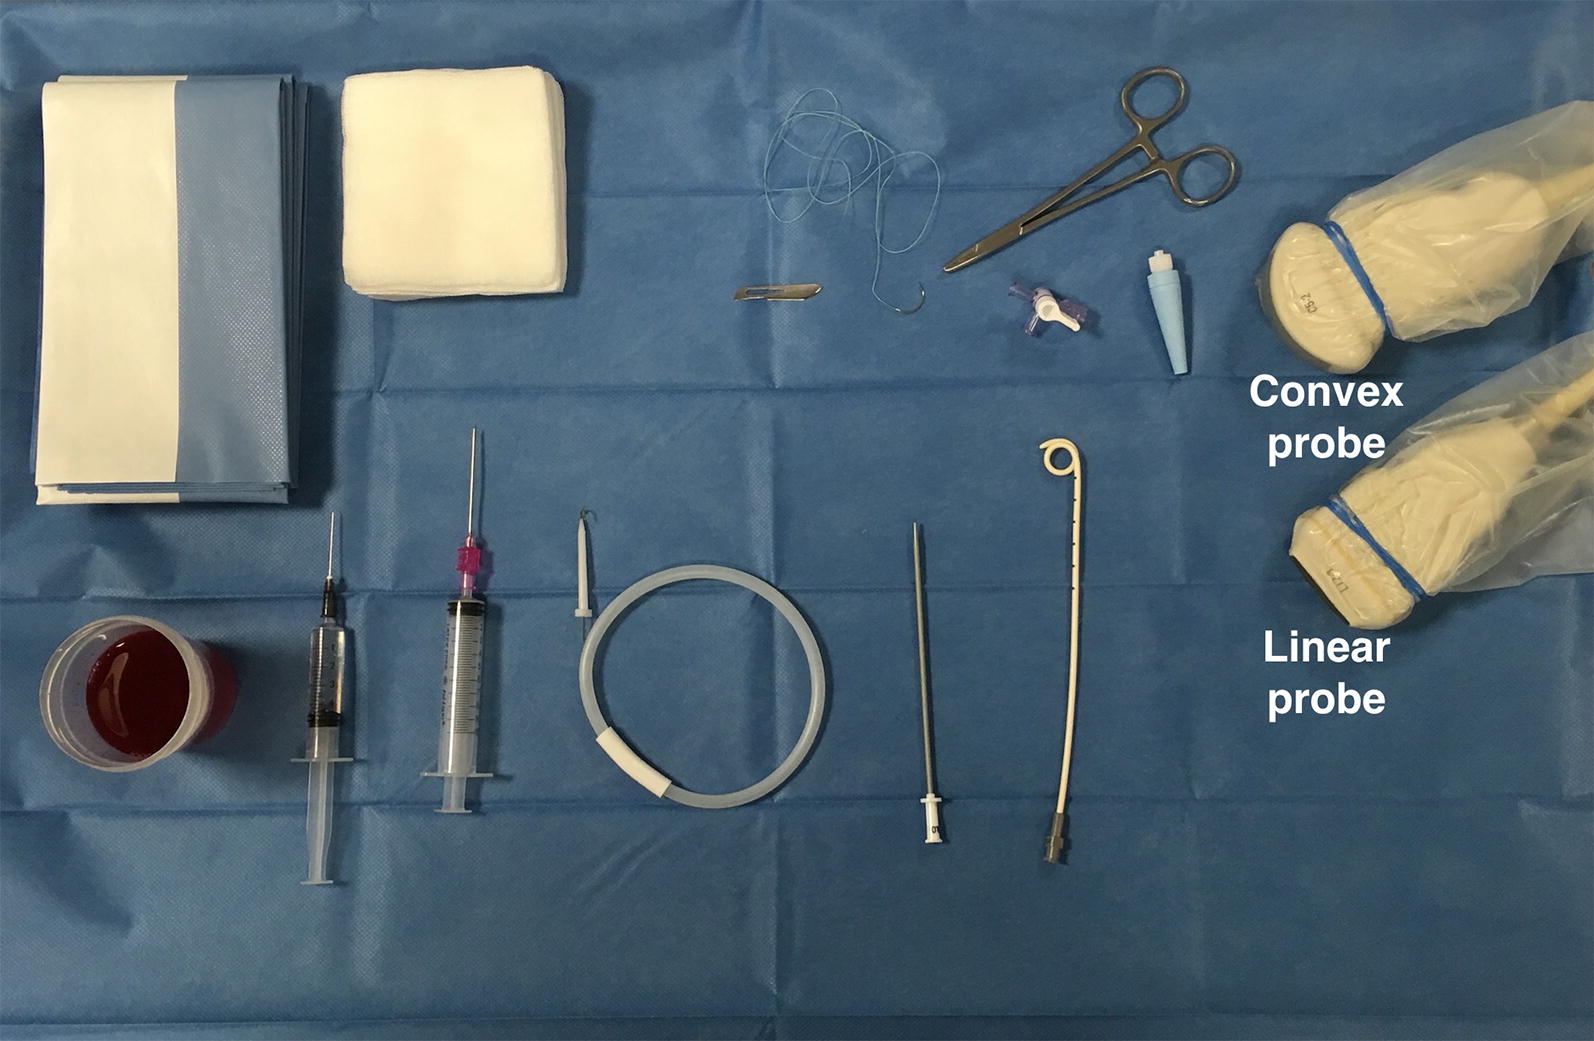
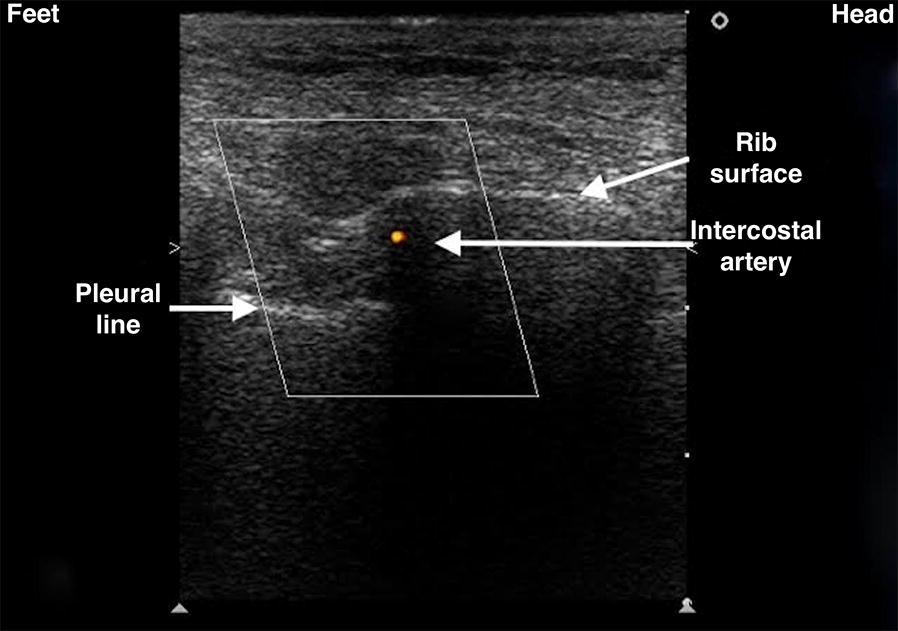
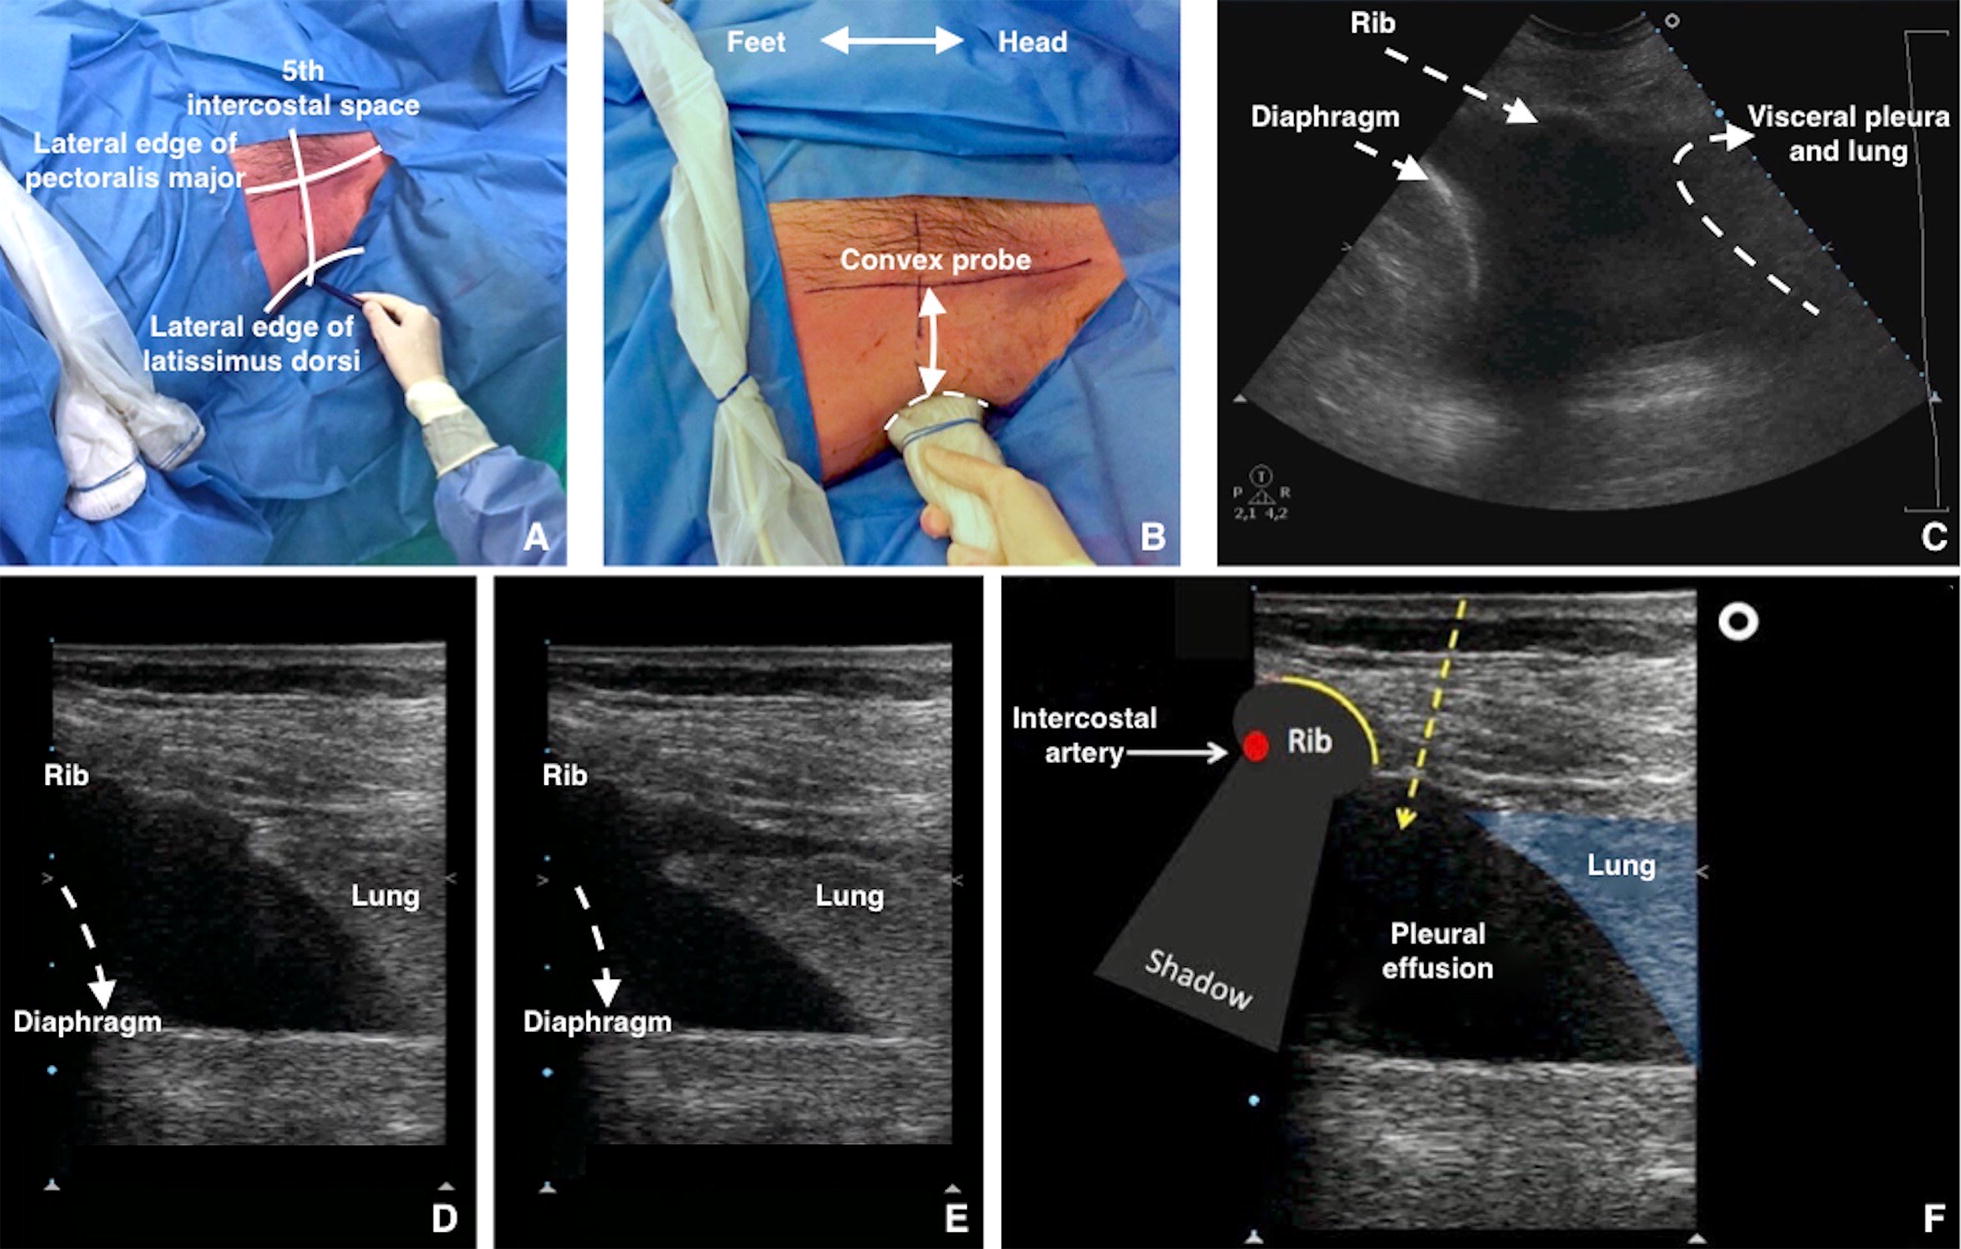
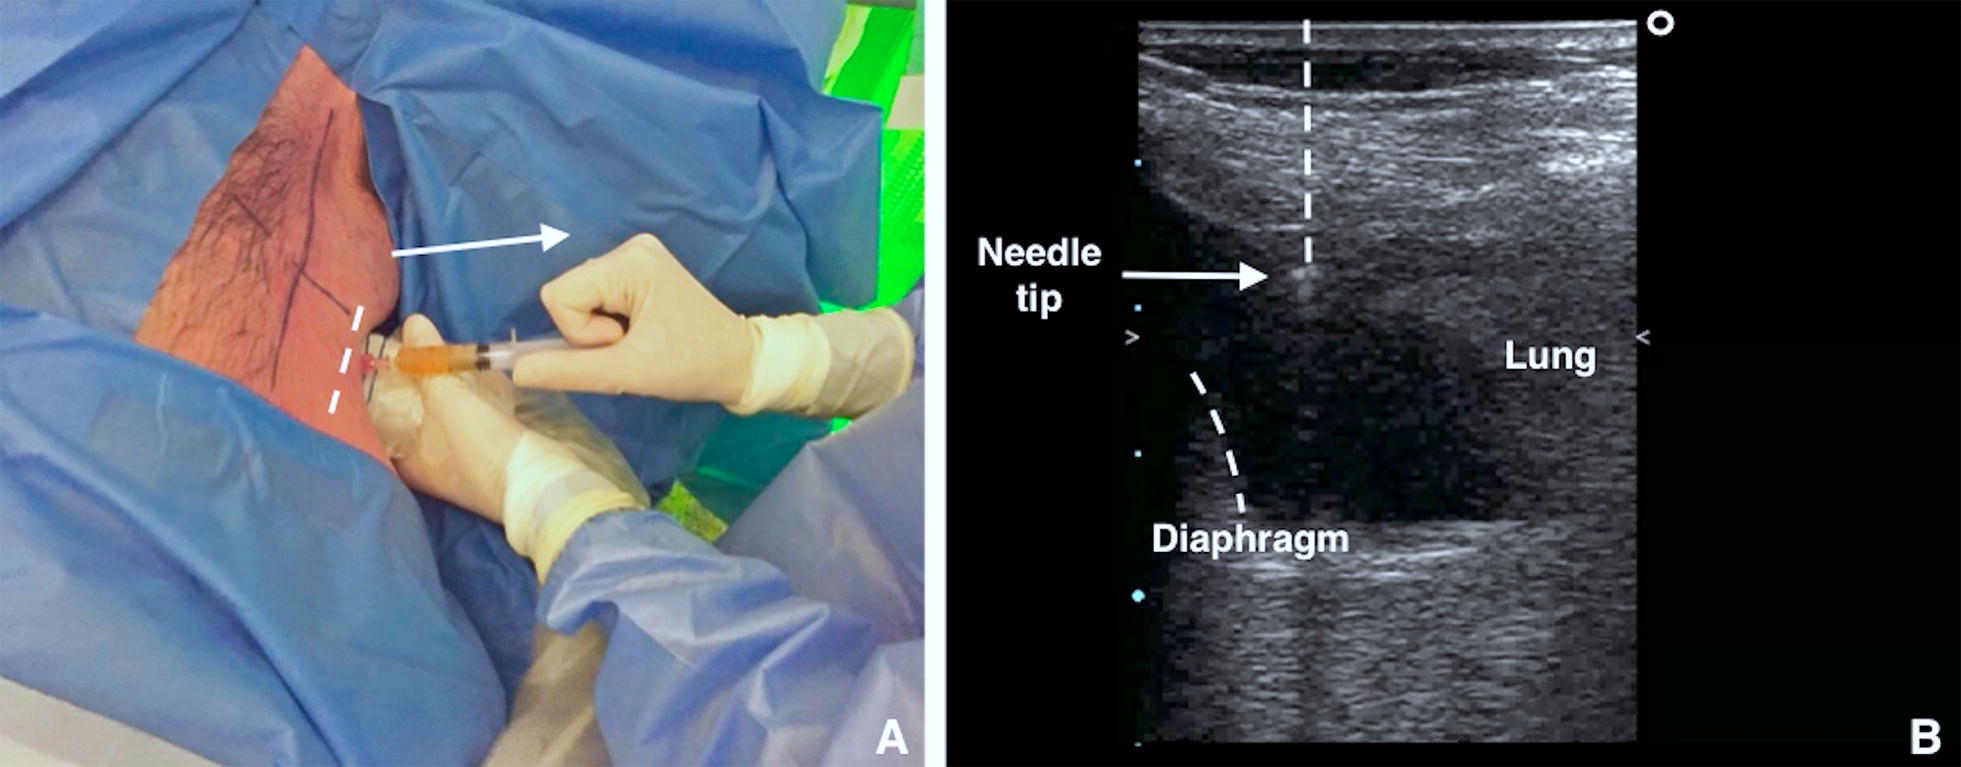
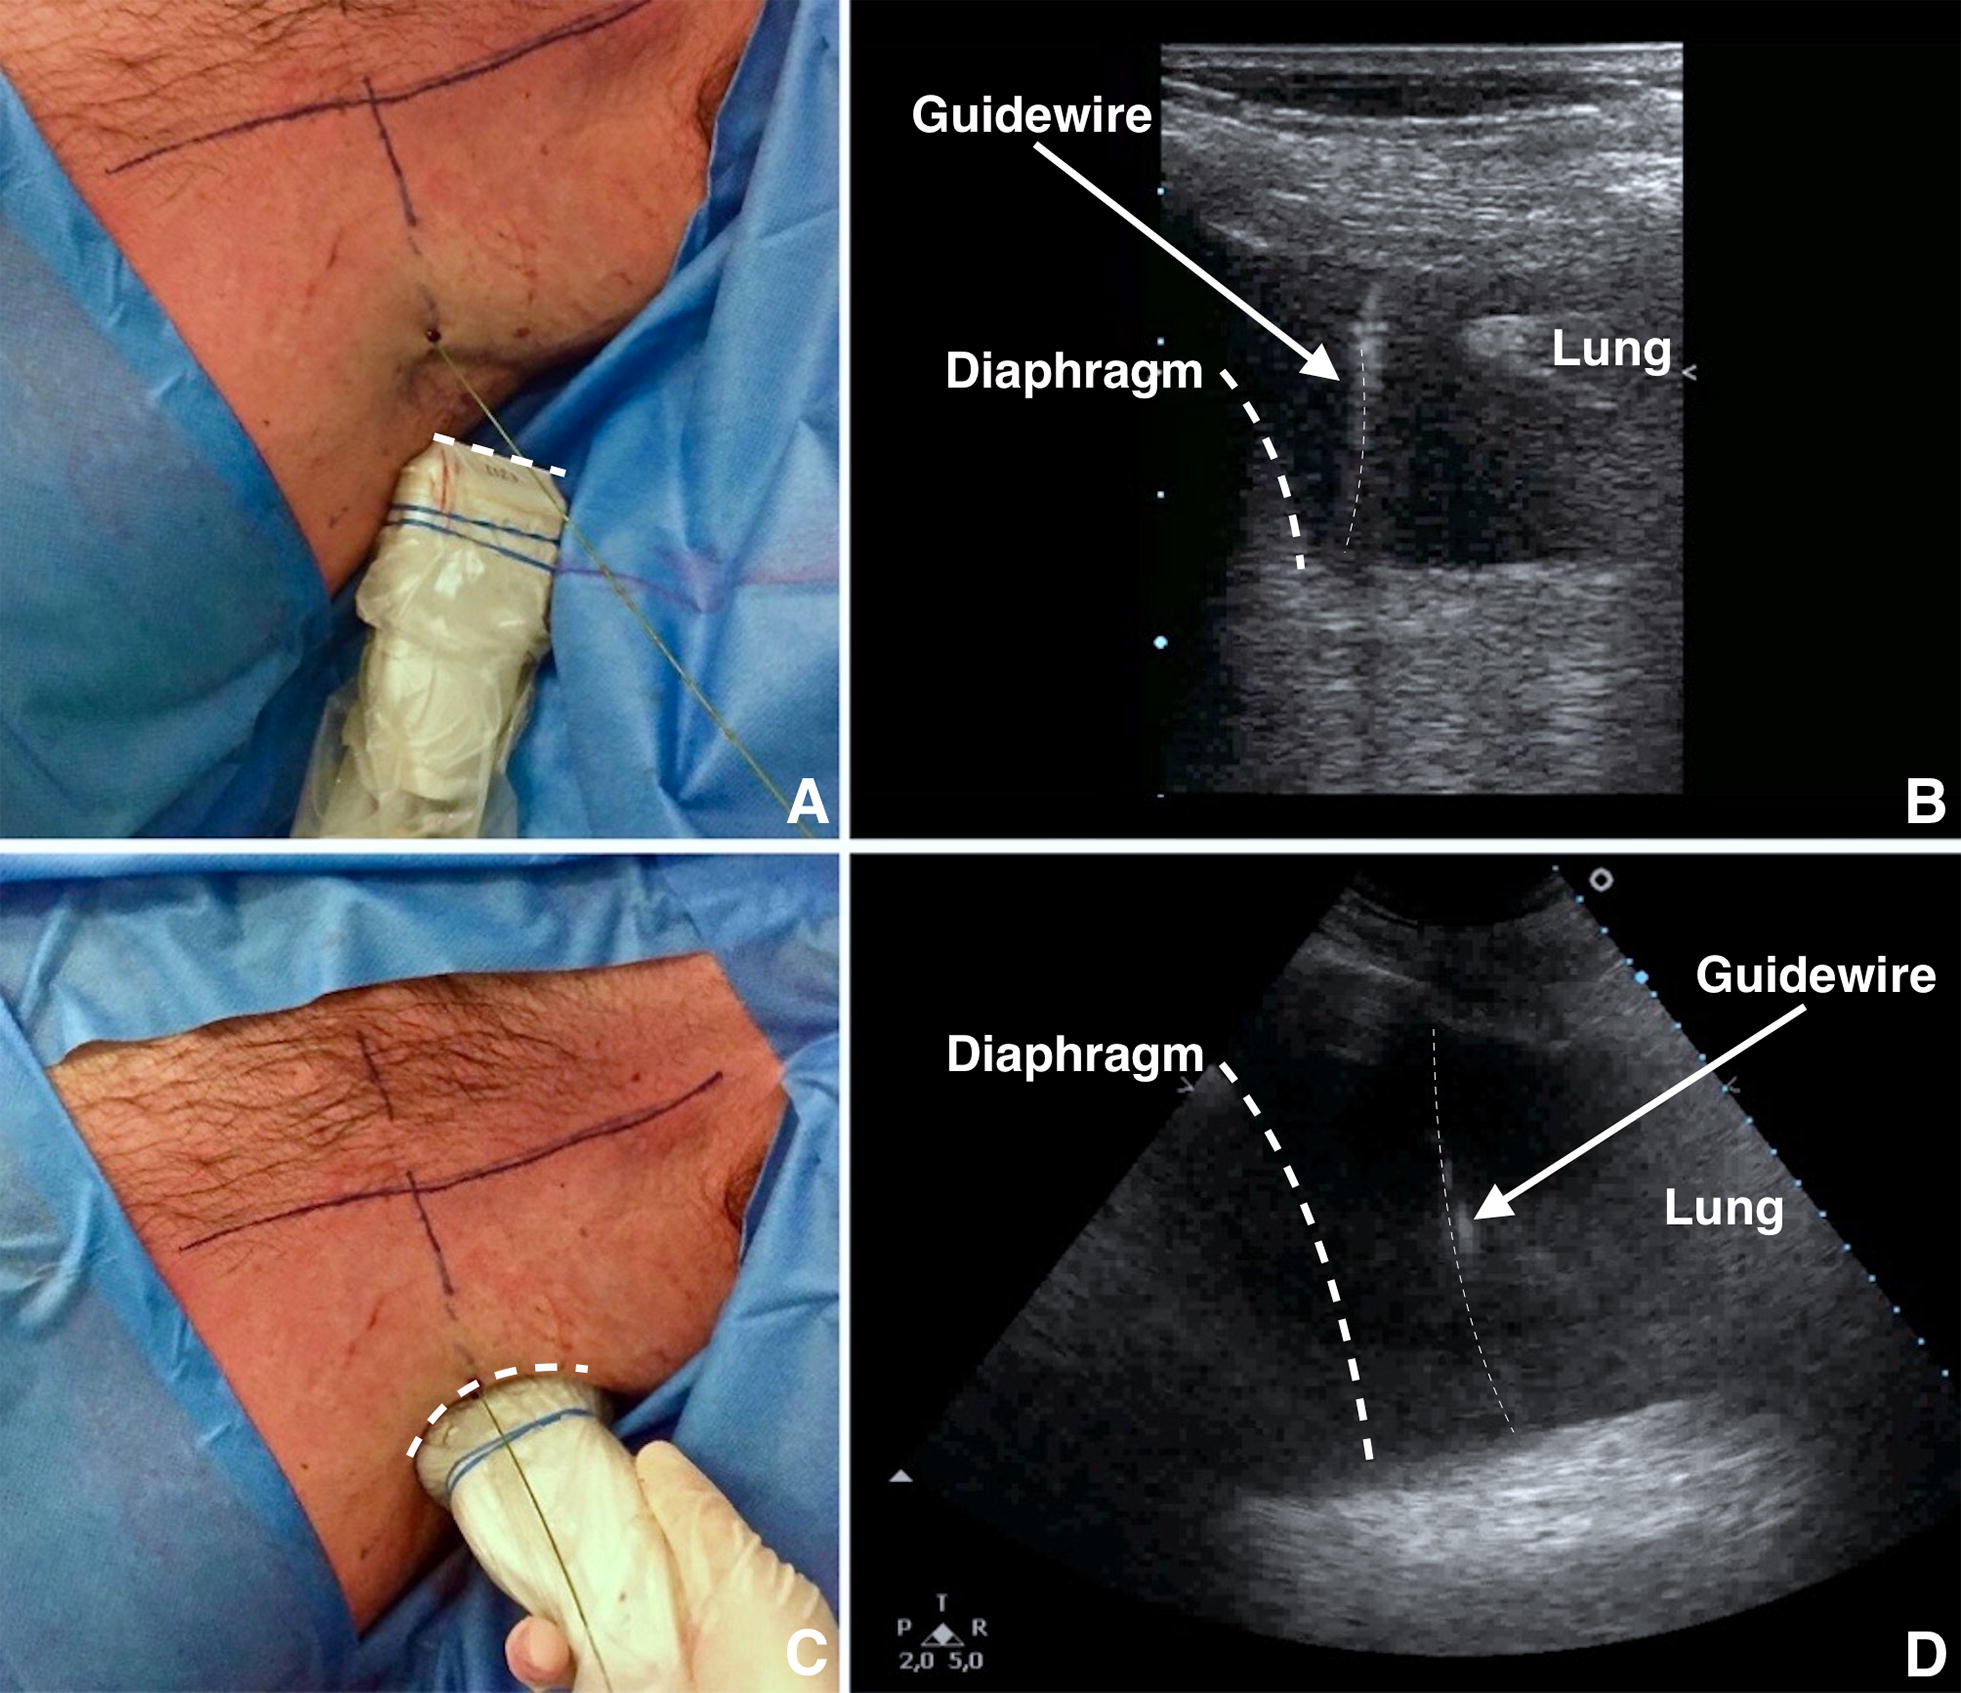
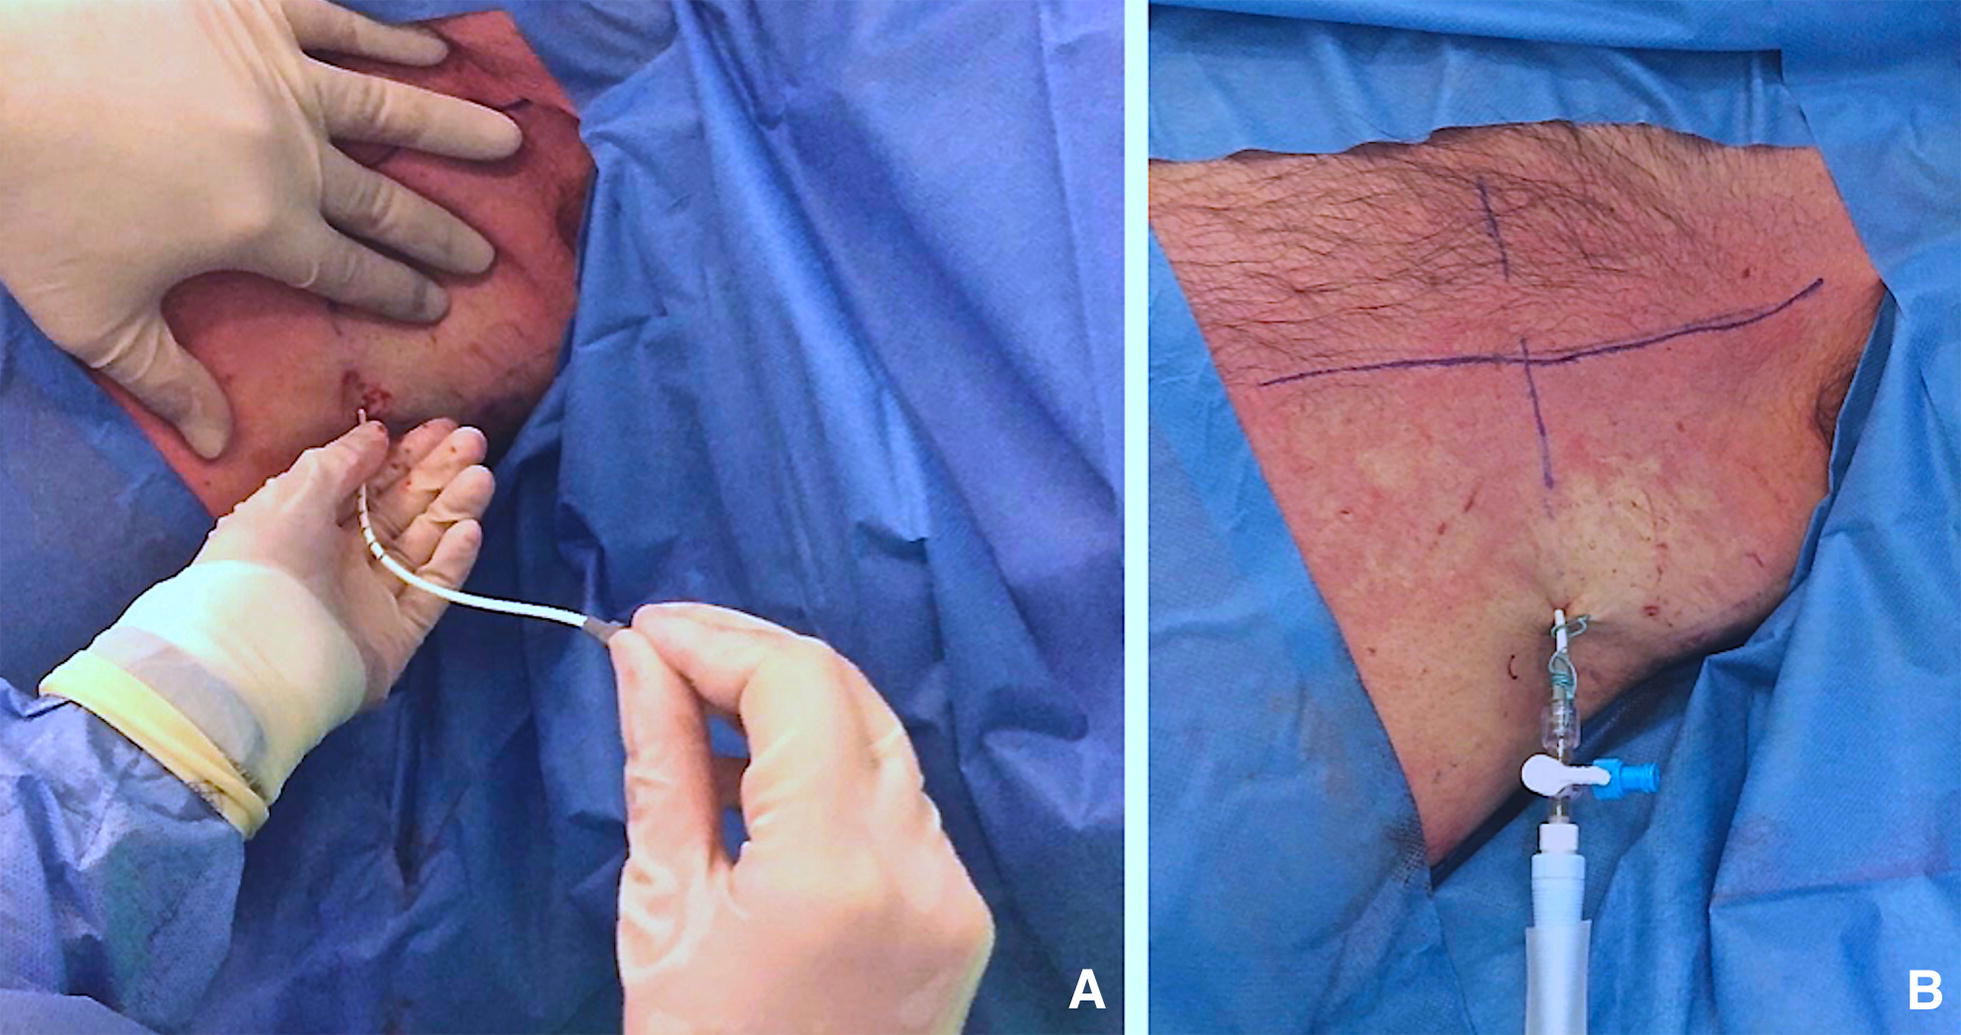
Thoracic ultrasound is a powerful diagnostic imaging technique for pleural space disorders. In addition to visualising pleural effusion, thoracic ultrasound also helps clinicians to identify the best puncture site and to guide the drainage insertion procedure. Thoracic ultrasound is essential during these invasive manoeuvres to increase safety and decrease potential life-threatening complications. This paper provides a technical description of pigtail-type drainage insertion using thoracic ultrasound, paying particular attention to indications, contraindications, ultrasound guidance, preparation/equipment, procedure and complications.

Keywords: Pleural drainage; Pleural effusion; Thoracic ultrasound; Ultrasound guidance.


Figures

Fig. 1
Fig. 1
A set of pleural drainage tools on the tray
Fig. 2
Fig. 2
Visualisation of intercostal vessels using Doppler ultrasound. The probe marker is facing the patient’s head (on the right of the screen). The colour Doppler box should be placed on the bottom edge of the rib and the depth reduced until the rib does not occupy the entire screen. Pulse repetition frequency (PRF) should be reduced until pulsation is detected
Fig. 3
Fig. 3
A Identify and draw the safety triangle. Note both convex and linear probes are present. B, C Use a low-frequency US transducer (convex or phased array probe) to identify the best puncture site. The best puncture site is where the operator can visualise each anatomical structures (i.e., diaphragm, pleural, organs) and can measure the maximum distance between visceral and parietal pleural (increasing the safety margin). The probe should be used in the transverse position between two ribs. The probe marker is facing the patient’s head (on the right of the screen). D At the end-expiration (high-frequency US transducer) diaphragm reaches the most cranial position. E At the end inspiration (high-frequency US transducer) lung reaches the most caudal position. F A high-frequency US transducer (linear probe) should be used in the transverse position, between two ribs to understand the upper and lower border of the needle insertion area. The probe marker is facing the patient’s head (on the right of the screen). The operator designs the course of the needle within the expected insertion area
Fig. 4
Fig. 4
A Using the high-frequency US transducer (linear probe) in the transverse position, the puncture is performed employing short axis ultrasound-guidance (out of plane technique) at the point previously identified. Aspiration of fluid with a syringe confirms correct position of the needle tip. B With direct needle guidance, the correct position of the needle tip is visualised in real-time and is monitored constantly
Fig. 5
Fig. 5
A Remove the syringe from the needle and pass the guidewire through the needle. After inserting the guidewire, remove the needle, leaving the guidewire in place. B Employing a high-frequency US transducer (linear probe) it is possible to visualise the insertion of the guidewire in real-time. C Shift to low-frequency US transducer (convex probe) to define the final position of the guidewire using US. It is mandatory to check the correct insertion of the guidewire at the end of the procedure. D As shown, the guidewire is correctly positioned within pleural effusion
Fig. 6
Fig. 6
A Using the high-frequency probe, it is possible to calculate the distance between the skin and parietal pleura. B The dilator should not be inserted further than 1 cm beyond the depth from skin to pleural space
Fig. 7
Fig. 7
A The pigtail is passed over the guidewire, making sure that the last side hole is within the pleural space. Remove the guidewire, leaving the pigtail catheter in place. After the guidewire has been removed, the drain is connected to the drainage system. B Suture the pigtail to the chest wall in a manner similar to conventional chest tubes

References

    1. Azoulay E. Pleural effusions in the intensive care unit. Curr Opin Pulm Med. 2003;9(4):291–297. doi: 10.1097/00063198-200307000-00008. - DOI - PubMed
    1. Fartoukh M, Azoulay E, Galliot R, et al. Clinically documented pleural effusions in medical ICU patients: how useful is routine thoracentesis? Chest. 2002;121(1):178–184. doi: 10.1378/chest.121.1.178. - DOI - PubMed
    1. Mattison LE, Coppage L, Alderman DF, et al. Pleural effusions in the medical ICU: prevalence, causes, and clinical implications. Chest. 1997;111(4):1018–1023. doi: 10.1378/chest.111.4.1018. - DOI - PubMed
    1. Goligher EC, Leis JA, Fowler RA, et al. Utility and safety of draining pleural effusions in mechanically ventilated patients: a systematic review and meta-analysis. Crit Care. 2011;15:R46. doi: 10.1186/cc10009. - DOI - PMC - PubMed
    1. Gargani L, Picano E. The risk of cumulative radiation exposure in chest imaging and the advantage of bedside ultrasound. Crit Ultrasound J. 2015;7:4. doi: 10.1186/s13089-015-0020-x. - DOI - PMC - PubMed

LinkOut - more resources