Review
. 2021 Sep;37(Suppl 3):454-475.
doi: 10.1007/s12055-021-01218-w. Epub 2021 Sep 18.

Lung transplantation: how we do it

Affiliations
Review

Lung transplantation: how we do it

John Santosh Murala et al. Indian J Thorac Cardiovasc Surg. 2021 Sep.

Abstract

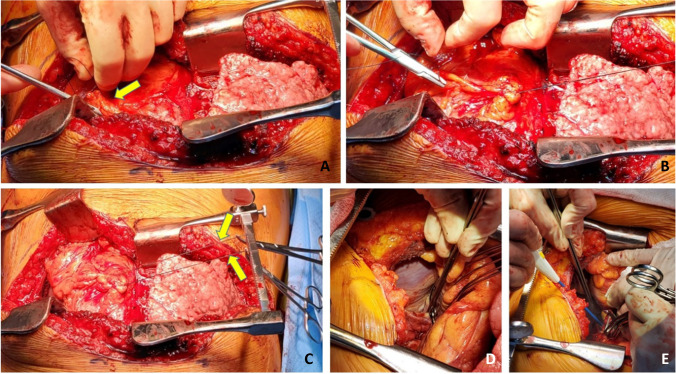
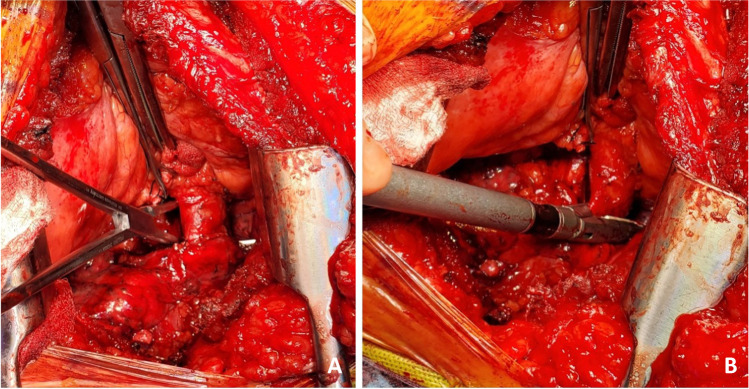
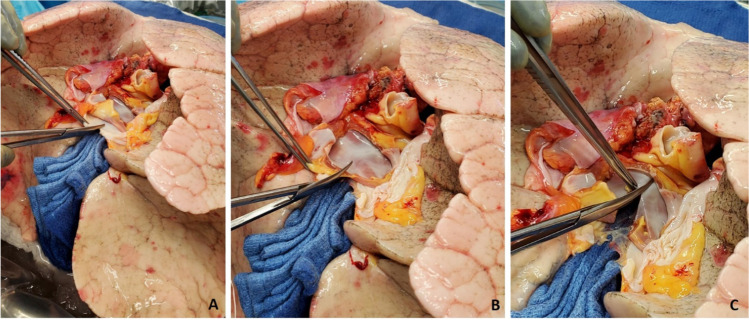
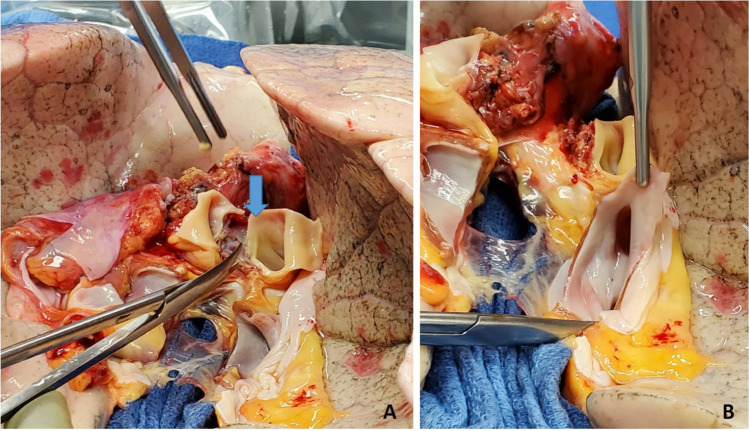
Lung transplantation is considered the gold standard for patients with chronic end-stage pulmonary disease. However, due to the complexity of management and relatively lower median survival as compared to other solid organs, many programs across the world have been slow to adopt the same. In our institution, we started lung transplantation in September 1990. And since then, we performed close to 900 lung transplantations. Here, we describe in detail the operative steps adopted in our institution for a successful lung transplantation. There have been very few variations over the years. We believe that having a standardized technique is one of the important features for success of a lung transplant program.

Keywords: End-stage pulmonary disease; Lung transplantation; Operative technique.


Conflict of interest statement

Conflict of interestThe authors declare no competing interests.

Figures

Fig. 1
Fig. 1
Showing the position and the marking on the chest wall for incision. Both groins are left open for cannulation. Single lung ventilation is planned with left sided double-lumen endotracheal tube
Fig. 2
Fig. 2
The incision. A Bilateral thoracotomies with Wilson retractor as viewed from head end. B Right mammary vessels clipped (yellow arrow). C Sternotomy performed. D Tuffier retractors placed on either side — showing an elevated dome of diaphragm on the right side
Fig. 3
Fig. 3
Exposure of left thoracic cavity. A Retraction suture placed in the mediastinal fat over the pericardium (yellow marker). B Similarly, a second suture is placed. C Both the retraction sutures are pulled across the right lung retracting the pericardium and opening up the left thoracic cavity (yellow markers). Also note that the Tuffier retractor is moved closer to the sternum to facilitate wider opening. D A lung retractor can be used to retract the left hilum. E Duval clamps are used on hilar structures and retracted medially for dissection of hilum. All the above pictures are as viewed from head end
Fig. 4
Fig. 4
A Pulmonary vein dissected and looped with silk. B Echelon 45 vascular stapler across the pulmonary vein
Fig. 5
Fig. 5
A Left pulmonary artery dissected. B Echelon 45 vascular stapler across the pulmonary artery
Fig. 6
Fig. 6
A Left bronchus being divided. The membranous portion is divided using diathermy. B Divided bronchus (yellow marker)
Fig. 7
Fig. 7
The hilar structures are retracted using sponge sticks exposing the bronchus. The bronchus is retracted using a metal Yankauer suction tip and surrounding tissues are dissected
Fig. 8
Fig. 8
A Babcock forceps on the pulmonary stump (blue marker) and surrounding tissues dissected. B Long pulmonary artery pedicle (blue marker)
Fig. 9
Fig. 9
Pulmonary vein cuff being prepared. There is limited space. A The pulmonary veins being held by a Duvall clamps and retracted towards the assistant to dissect the intra-pericardial portion. B The intra-pericardial portion of the left atrial cuff being dissected (yellow marker)
Fig. 10
Fig. 10
The hilar structures all dissected. The key being long pedicles. A Prepared bronchial stump (green marker), B left atrial cuff (yellow marker), pulmonary artery cuff (blue marker)
Fig. 11
Fig. 11
A The lateral most para-costal sutures are placed before the implantation. B Cryo-analgesia to intercostal space
Fig. 12
Fig. 12
A Pericardium being divided. B Left atrial cuff divided in the middle. C Completing division of LA cuff (note the offset with the pulmonary artery bifurcation)
Fig. 13
Fig. 13
A Showing the division of PA to the right side of the raphe (blue marker). Note the offset of pulmonary bifurcation from the midline of LA. B Left pulmonary venous cuff
Fig. 14
Fig. 14
A Left bronchus stapled with TA 30 vascular staple. B Bronchus divided and the lung is deflated. C Bronchus fashioned
Fig. 15
Fig. 15
Hilar structures shown. The pulmonary veins are retracted using Babcock forceps and pulmonary artery using a sponge stick. The bronchus is sucked and is ready for the anastomosis. The donor lung is placed in the costo-mediastinal sulcus
Fig. 16
Fig. 16
A Left bronchial stump is exposed (green marker). B Donor and recipient bronchus are aligned (both green markers). C The membranous portion sutured with continuous suture (green marker). D Multiple figure of 8 sutures placed and are held taut before tying them
Fig. 17
Fig. 17
The membranous portion of the bronchial anastomosis is completed. Note that both ends are fixed to the drape to maintain tension
Fig. 18
Fig. 18
Interrupted figure of “8” sutures are placed in the cartilaginous portion. This is a rough representation of how we place figure of “8” sutures sequentially from either ends and move towards center. Inset when the figure of “8” sutures are tied, tension is applied on all sutures. On either ends, one end of the figure of “8” suture is tied to the end of the continuous suture
Fig. 19
Fig. 19
Completed bronchial anastomosis. Note a perfectly placed sutures form “X” on the anastomosis. Here, the recipient bronchus has been intussuscepted into the donor bronchus
Fig. 20
Fig. 20
Set up for a PA anastomosis. A The pulmonary artery is clamped with a Lee bronchus clamp, wrapped with opened gauze, and fixed to the drape. B The stapled edge has been opened and the PA is trimmed. C Completed PA anastomosis
Fig. 21
Fig. 21
Anastomosis of PA completed and the suture is not tied
Fig. 22
Fig. 22
Set up for LA anastomosis. A The pulmonary veins being retracted by two Babcock clamps. B Satinsky clamp being placed at the base of the LA well beyond the bifurcation. C Completed posterior wall anastomosis of LA (yellow marker)
Fig. 23
Fig. 23
A right-angled clamp is passed through both veins and the LA is being opened
Fig. 24
Fig. 24
Completed LA anastomosis. Note both PA and LA sutures are not tied at this stage
Fig. 25
Fig. 25
Showing the sequence of retrograde de-airing in a right lung. A Both clamps are on and both sutures are untied. B The Satinsky clamp removed from LA, keeping both ends of suture under tension. C The suture line of the PA is loosened using a nerve hook to drain the remaining Perfadex in the lung and also for retrograde de-airing. D Removal of the Lee bronchus clamp from the PA
Fig. 26
Fig. 26
Dissection of right pulmonary veins. A Right-angled clamp loops the pulmonary vein. B Silk suture passed around. C Stapled across with Flex 45 stapler. D Duval clamp used to lift the inferior lobe. E The inferior pulmonary ligament is divided with LigaSure. F The inferior pulmonary vein is looped
Fig. 27
Fig. 27
Dissection of the right pulmonary artery. A Note that the diaphragm has been pulled inferiorly with a silk stay suture with a rolled gauze (yellow marker) placed between the suture and the diaphragm. This silk suture is brought out through a separate incision and fixed with two hemostats pulmonary artery dissected showing the truncus intermedius and superior or truncus anterior branch. B The large intermedius branch looped with silk. C TX 30 vascular stapler (Ethicon Proximate TX Reloadable Linear Stapler) stapled distally. D Proximal stapling. E Divided between staple line. F Truncus anterior branch looped
Fig. 28
Fig. 28
The dissected right bronchus stump is shown
Fig. 29
Fig. 29
Right diaphragm plication after pneumonectomy. A view from head end. A Elevated diaphragm. B Serial pledgetted sutures taken. C Plication completed
Fig. 30
Fig. 30
Back bench preparation of right lung. A Right LA cuff. B Donor bronchus fashioned with a no.15 blade. C Donor bronchus trimmed to 2 rings from the upper lobe take-off
Fig. 31
Fig. 31
Right bronchus anastomosis. A First suture from outside-in on recipient at the membrano-cartilaginous junction. B The same suture taken from inside-out in the donor bronchus at corresponding end membrano-cartilaginous junction. C Completed membranous portion continuous suture (green marker). D Figure of “8” sutures started from either ends (green markers). E Sutures tied. F Completed anastomosis
Fig. 32
Fig. 32
Right pulmonary artery anastomosis. A Duval clamp and Babcock forceps holding the stump of PA and a Lee bronchus clamp is being applied. B The clamp is being wrapped with an opened gauze and fixed to the drape. C Stapled ends have been cut open. D Anastomosis of PA. E Flush with heparinized saline. F Completed anastomosis with suture ends not tied
Fig. 33
Fig. 33
Left atrial anastomosis of the right lung. A The left atrial cuff being pulled by two Babcock forceps to the stapled pulmonary veins. Note the direction of the inferior Babcock forceps (along the stapled line which is antero-posterior). B Two Duval forceps being used to pull the pulmonary veins while the Satinsky clamp is being placed at the base. C The Satinsky clamp is wrapped with an opened gauze and fixed to the drape. Note that both the PA and LA clamps are fixed to the drape. D LA opened by passing right-angled clamp through both pulmonary veins
Fig. 34
Fig. 34
Left atrial anastomosis for the right lung. A The LA is cut opened. B LA donor cuff is fashioned (yellow marker). Note the PA anastomosis is completed (blue marker). C LA anastomosis started. D Note intima-to-intima anastomosis. E Completed posterior wall anastomosis with intimal apposition. F Completed PA (blue marker) and LA anastomosis (yellow marker)
Fig. 35
Fig. 35
Sternal closure (all images are viewed from the head end). A Transplanted bilateral lungs. B Placement of drains bilaterally (medially straight drains and laterally Blake drains). C Multiple para-costal figure of “8” sutures with AcuTie sternal fixation of sternum. D Sutures tied and AcuTie and sternal wire tightened
Fig. 36
Fig. 36
Chest closure and location of drains
Fig. 37
Fig. 37
Bilateral LT on CPB

References

    1. Toronto Lung Transplant Group Unilateral lung transplantation for pulmonary fibrosis. N Engl J Med. 1986;314:1140–1145. doi: 10.1056/NEJM198605013141802. - DOI - PubMed
    1. Patterson GA, Cooper JD, Goldman B, et al. Technique of successful clinical double-lung transplantation. Ann Thorac Surg. 1988;45:626–33. doi: 10.1016/S0003-4975(10)64763-7. - DOI - PubMed
    1. Pasque MK, Cooper JD, Kaiser LR, Haydock DA, Triantafillou A, Trulock EP. Improved technique for bilateral lung transplantation: rationale and initial clinical experience. Ann Thorac Surg. 1990;49(5):785–791. doi: 10.1016/0003-4975(90)90023-y. - DOI - PubMed
    1. Meyers BF, Sundaresan RS, Guthrie T, Cooper JD, Patterson GA. Bilateral sequential lung transplantation without sternal division eliminates post transplantation sternal complications. J Thorac and Cardiovasc surg. 1999;117(2):358–364. doi: 10.1016/S0022-5223(99)70434-4. - DOI - PubMed
    1. Lonchyna VA. Single lung transplantation. Operative Tech Thorac Cardiovasc Surg. 1999;4:142–161. doi: 10.1016/S1522-2942(07)70111-3. - DOI

LinkOut - more resources