. 2021 Dec 8;14(24):7526.
doi: 10.3390/ma14247526.

Bondline Thickness Effects on Damage Tolerance of Adhesive Joints Subjected to Localized Impact Damages: Application to Leading Edge of Wind Turbine Blades

Affiliations

Bondline Thickness Effects on Damage Tolerance of Adhesive Joints Subjected to Localized Impact Damages: Application to Leading Edge of Wind Turbine Blades

Amrit Shankar Verma et al. Materials (Basel). .

Abstract

The leading edges of wind turbine blades are adhesively bonded composite sections that are susceptible to impact loads during offshore installation. The impact loads can cause localized damages at the leading edges that necessitate damage tolerance assessment. However, owing to the complex material combinations together with varying bondline thicknesses along the leading edges, damage tolerance investigation of blades at full scale is challenging and costly. In the current paper, we design a coupon scale test procedure for investigating bondline thickness effects on damage tolerance of joints after being subjected to localized impact damages. Joints with bondline thicknesses (0.6 mm, 1.6 mm, and 2.6 mm) are subjected to varying level of impact energies (5 J, 10 J, and 15 J), and the dominant failure modes are identified together with analysis of impact kinematics. The damaged joints are further tested under tensile lap shear and their failure loads are compared to the intact values. The results show that for a given impact energy, the largest damage area was obtained for the thickest joint. In addition, the joints with the thinnest bondline thicknesses displayed the highest failure loads post impact, and therefore the greatest damage tolerance. For some of the thin joints, mechanical interlocking effects at the bondline interface increased the failure load of the joints by 20%. All in all, the coupon scale tests indicate no significant reduction in failure loads due to impact, hence contributing to the question of acceptable localized damage, i.e., damage tolerance with respect to static strength of the whole blade.

Keywords: composite; damage; impact; offshore wind turbine; wind turbine blade.


Conflict of interest statement

The authors declare no conflict of interest.

Figures

Figure 1
Figure 1
(a) Lifing phase of wind turbine blade [5]; (b) collision scenario [2]; (c) localized impact damage at adhesive joint of leading edge [2].
Figure 2
Figure 2
(a) Wind turbine blade cross section [9]. (b) Leading edge joint with top and bottom substrate with material orientation ([+45/45/0]s) (where 0-degree layer is along the blade span).
Figure 3
Figure 3
Single lap adhesive joint representation of leading edge at coupon scale.
Figure 4
Figure 4
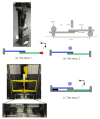
Different test setups used for testing adhesive joints under impact loads [51,56,59].
Figure 5
Figure 5
(a) Full scale Finite Element Model (FEA) model from [2], (b) comparison of internal energy and elastic energy in the blade [2], (c) magnitude of damage energy developed in full scale blade [2], and (d) coupon scale impact parameters.
Figure 6
Figure 6
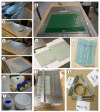
Step-by-step procedure (ak) followed in experiment for preparing laminates and adhesive joints.
Figure 7
Figure 7
(a) Configuration of prepared adhesive joints and (b) layup of top and bottom substrate.
Figure 8
Figure 8
Setup for testing adhesive joints under lap shear (left) and through the thickness surface prepared for failure analysis (right).
Figure 9
Figure 9
Test setup constructed for impact testing on single lap adhesive joints.
Figure 10
Figure 10
Different stages of impact event recorded by camera.
Figure 11
Figure 11
Description of impact kinematics: Theoretical %ΔDCOR curve.
Figure 12
Figure 12
Tensile lap shear test results for intact joints: (a) Force-displacement history, (b) dominant failure mode, and (c) state of joint at different points A–H along the force-displacement history.
Figure 13
Figure 13
Failure mode subjected to tensile lap shear for joints with bondline thicknesses (0.6 mm, 1.6 mm, and 2.6 mm).
Figure 14
Figure 14
Comparison of intact failure loads with varying bondline thicknesses.
Figure 15
Figure 15
Description of impact kinematics: (a) %ΔDCOR curves for different impact velocities, (b) magnified image showing variation of COR and %ΔD, (c) %ΔDCOR curves for different bondline thicknesses, and (d) absorbed energy in the specimens for different impact velocities and bondline thicknesses.
Figure 16
Figure 16
Damages in the joints subjected to different impact energies of 5 J, 10 J, and 15 J for bondline thickness: (a) 0.6 mm, (b) 1.6 mm, and (c) 2.6 mm.
Figure 17
Figure 17
Projected damage area obtained in the joints with bondline thickness (0.6 mm, 1.6 mm, and 2.6 mm) and subjected to impact energy (5 J, 10 J, and 15 J).
Figure 18
Figure 18
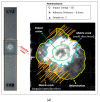
Different failure modes in the joints subjected to impact energy of 15 J for bondline thickness of (a) 0.6 mm and (b) 1.6 mm.
Figure 18
Figure 18
Different failure modes in the joints subjected to impact energy of 15 J for bondline thickness of (a) 0.6 mm and (b) 1.6 mm.
Figure 19
Figure 19
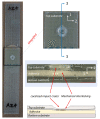
Cross-sectional scan of joint with bondline thickness of 0.6 mm subjected to 15 J of impact energy.
Figure 20
Figure 20
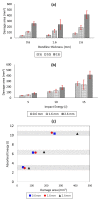
Comparison of impact-induced projected damage area in joints for different (a) bondline thicknesses, (b) impact energies, and (c) absorbed energies.
Figure 21
Figure 21
Comparison of post impact failure load of joints for different bondline thickness after being subjected to an impact energy of (a) 5 J, (b) 10 J, and (c) 15 J.
Figure 22
Figure 22
Comparison of post impact failure load of joints after being subjected to different impact energy: (a) Bondline thickness of 0.6 mm, (b) bondline thickness of 1.6 mm, and (c) bondline thickness of 2.6 mm.
Figure 23
Figure 23
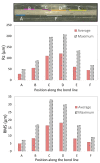
Comparison of surface roughness along the bondline interface for joint with a bondline thickness of 0.6 mm subjected to an impact energy of 15 J.
Figure 24
Figure 24
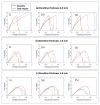
Comparison of post-impact load displacement history with intact load displacement history (baseline) for different bondline thicknesses and impact energies.

References

    1. Acero W.I.G. Ph.D. Thesis. Norwegian University of Science and Technology (NTNU); Trondheim, Norway: 2016. Assessment of Marine Operations for Offshore Wind Turbine Installation with Emphasis on Response-Based Operational Limits.
    1. Verma A.S., Vedvik N.P., Gao Z. A comprehensive numerical investigation of the impact behaviour of an offshore wind turbine blade due to impact loads during installation. Ocean Eng. 2019;172:127–145. doi: 10.1016/j.oceaneng.2018.11.021. - DOI
    1. Verma A.S., Jiang Z., Vedvik N.P., Gao Z., Ren Z. Impact assessment of a wind turbine blade root during an offshore mating process. Eng. Struct. 2019;180:205–222. doi: 10.1016/j.engstruct.2018.11.012. - DOI
    1. Verma A.S., Zhao Y., Vedvik N.P., Gao Z. Proceedings of the Fourth International Conference in Ocean Engineering (ICOE2018) Springer; Singapore: 2018. Explicit structural response-based methodology for assessment of operational limits for single blade installation for offshore wind turbines.
    1. Ad-liftra—Own Work, CC BY-SA 3.0. [(accessed on 11 October 2021)]. Available online: https://commons.wikimedia.org/w/index.php?curid=23253956.