Editorial
doi: 10.5935/0004-2749.2021-0318.
Photodocumentation in oculoplastic surgery: an up-to-date overview
Affiliations
- PMID: 36228239
- PMCID: PMC11826790
- DOI: 10.5935/0004-2749.2021-0318
Item in Clipboard
Editorial
Photodocumentation in oculoplastic surgery: an up-to-date overview
Arq Bras Oftalmol.
2022 Sep-Oct.
No abstract available
Conflict of interest statement
Figures

Suggested positioning of the patient and physician, with the patient
seated on a swivel stool with no wheels and a floor mat with footmarks
for the front, oblique (45°), and profile positions. The camera,
preferably mounted on a tripod, must be aligned to the patient’s face
with the external flash directed at the ceiling, and a white diffuser
reflector attached to the body of the flash was used (white side not
visible). The first photo must be taken with the patient holding a 18%
gray card so that if any adjustment to the white balance is necessary,
the card can serve as a reference in the photo editing software.

Primary position gaze (PPG). The camera’s thirds grid was used so that
the upper horizontal line passes through the pupils and the apex of the
patient’s ears. Oblique position (O). The patient is requested to rotate
the entire body to 45° until the tip of the nose aligns with the malar
eminence and the ear apex with the lateral eyelid canthus. Lateral view
framing (L): it is important to align the ear apex to the lateral eyelid
canthus and only the same side of Cupid’s bow can be seen.

Eyelid photography. The upper photographs demonstrate the preoperative
state of a blepharoplasty, primary position of gaze, right and left
oblique, and lateral views. Below, the same views in the third
postoperative month were taken to demonstrate background, patient
positioning, framing, and lightning standardization.
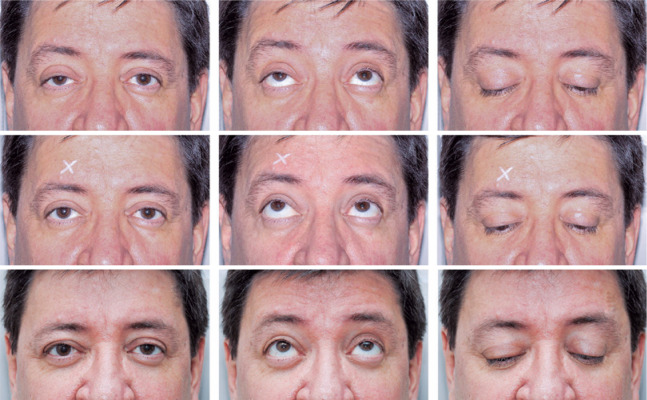
Ptosis photography. This was performed with a frontal flash to
demonstrate the margin reflex distance. The first row shows the
preoperative state from left to right: primary position of gaze, supra,
and infraversion. The second row shows the same views, after instilling
one drop of 10% phenylephrine into the right eye, as marked with an “X”
above the ipsilateral eyebrow. The third row corresponds to the same
views in the sixth postoperative month after a right levator aponeurosis
reinsertion with a posterior approach.

Orbit photography. These photographs demonstrate the views for orbital
pathologies. In the upper left, a primary position of gaze (1), and in
the upper right, the chin was lifted to demonstrate proptosis. (2) Other
photographs demonstrate ocular motility in infraversion (3),
infralevoversion (4), levoversion (5), supralevoversion (6),
supraversion (7), supradextroversion (8), dextroversion (9), and
infradextroversion (10).

Photography in dynamic wrinkles of the face. This figure illustrates the
pre- (first horizontal row) and post- (second horizontal row) state of
botulinum toxin treatment. From the left to the right of the reader, the
treatment of procerus and corrugators is demonstrated, patient makes an
“angry face”; treatment of the frontal muscle, the patient “raised her
forehead”; treatment of the orbicularis muscle (periorbital wrinkles),
the patient smiled and showed the right and left oblique,
respectively.

Macrophotography. These images illustrate how one can take photographs of
small lesions in the periocular region using the same flash (without the
need for another flash suitable for macrophotography). Thus, the focus
should be placed on the manual, with a focal plane of 0.38 m, a
magnification ratio of 1:1, f/11 aperture, shutter speed of 1/200, ISO
of 200-400 and flash in the TTL mode directed backward with light
reaching in this case, a 30-cm silver reflector. Note from the
photograph of the lesion, it was possible to obtain details of the
lesion without losing the portrayal of three-dimensionality since the
photo was taken with bounced light.

These two photographs reproduce a common error when a smaller frame of
the patient’s face is desired (“magnification”). In the left photo, a
100-mm lens at 3 m from the patient was used. As it is a telephoto lens,
the lens allows for the enlargement of the image and a smaller field of
view, that is, the same as distancing and using the “zoom” of
smartphones and compact cameras. In the right photo, we place a 35-mm
lens (“normal” lens for a camera with an APS-C sensor) and brought the
camera close to the patient’s face to try the same framing as that of
the previous photo. Note how the second photo creates distortions on the
patient’s face, with enlargement of the middle third of the face, mainly
the base of the nose, an effect that can be called “Christmas ball”
because it resembles the view that one can have of the face when looking
at a mirrored Christmas ball.

A common error when using the flash. The left photograph was taken with
an external flash bounced on the ceiling, and the right photo was taken
with an external flash directed straight at the patient’s face (frontal
flash). Note how relief (such as the apparent fat pockets of the lower
eyelids), shadows (such as the nasojugal groove), and wrinkles and skin
marks are more clearly shown in the first photograph. In the second
photograph, the frontal flash “flattens” the image, removing the idea of
three-dimensionality and favoring the patient in the sense of disguising
skin wrinkles and pigmentations, which is not suitable for medical
photographs in which one wishes to show the face with all its natural
features.
References
-
- Yavuzer R, Smirnes S, Jackson IT. Guidelines for standard photography in plastic surgery. Ann Plast Surg. 2001;46(3):293–300. - PubMed
-
- Zarem HA. Standards of photography. Plast Reconstr Surg. 1984;74(1):137–146. - PubMed
-
- Neff LL, Humphrey CD, Kriet JD. Setting up a medical portrait studio. Facial Plast Surg Clin North Am. 2010;18(2):231–236. - PubMed
-
- Ong CT, Kalantzis G, Yap JF, Chang B. Standardized photographic views in oculoplastic surgery: how to capture quality images outside a photographic studio. [cited 2021 nov 24];Cureus. 2016 8(4):e569. [Internet] Available from: Standardized Photographic Views in Oculoplastic Surgery: How to Capture Quality Images Outside a Photographic Studio - PMC (nih.gov) - PMC - PubMed
Publication types
MeSH terms
LinkOut - more resources
Full Text Sources
Medical