. 2023 Apr 1;15(4):e37017.
doi: 10.7759/cureus.37017. eCollection 2023 Apr.

Advancing Education in Endoscopic Spinal Navigation: Novel Methods and Technical Note

Affiliations

Advancing Education in Endoscopic Spinal Navigation: Novel Methods and Technical Note

Maria Eduarda Pertile et al. Cureus. .

Abstract

This report aims to demonstrate how to teach anatomy and understanding of spinal endoscopic vision and navigation using mnemonics. The authors present a new surgical technique for teaching endoscopic spinal navigation in a didactic manner with tips such as the "rule of the hand" and decomposition of the endoscopic navigation movement. We demonstrate how the surgery is seen and illustrate how images are projected onto the screen, then divide the navigation into spatial orientation and self-navigation. The article describes the proper puncture technique, how to introduce the working portal, and how to assimilate this new anatomical vision using the "rule of the hand." The surgeon projects their hand on the video screen to guide themselves when starting the navigation and uses the same technique to localize regions of interest during surgery. Finally, the authors break down the navigational movement into three components: forceps positioning, triangulation, and joystick motion. One of the biggest challenges when learning spinal endoscopic surgery is understanding the anatomy seen through the endoscope. By decomposing movements required for navigation, one can understand how to make proper use of the equipment as well as improve their knowledge of this "new anatomy." The learning methods taught in this article have the potential to decrease the learning curve and radiation exposure to those that are still acquainting themselves to spinal endoscopic navigation. We recommend that further studies measure and quantify the impact of these methods on surgical practice.

Keywords: endoscopic navigation; endoscopic spinal surgery; endoscopic surgery; innovative teaching learning; lumbar spine surgery; minimally-invasive spine surgery; spine; spine technology; surgery spine.


Conflict of interest statement

The authors have declared that no competing interests exist.

Figures

Figure 1
Figure 1. Angles of the transforaminal approach, and future point
Different angles of an endoscope: 15 degrees (A), 25 degrees (B), and 30 degrees (C). Assuming that the endoscope is inserted 10 cm from the midline, the 15-degree endoscope allows sight of the emerging root (thumb) but not the midline. The 25-degree endoscope allows good visualization of the emerging root and the midline (the index finger in B represents the transversing nerve root and posterior longitudinal ligament, not just the transversing nerve root, as seen in A). The 30-degree endoscope allows excellent visualization of the transversing nerve root (index finger). Future Point projection on 15 (D) and 30-degree (E) endoscopes, respectively. Note that a more angled endoscope means a greater distance from the camera to the working channel, making the future point visible in surgery. Green arrow – working channel; Yellow arrow – light source; Target sign – future point projection. Source: author
Figure 2
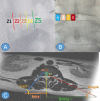
Figure 2. Intervertebral disc zoning, and entry point
(A) lateral view radiography showing the lumbar spine. (B) Anteroposterior view radiography showing the lumbar spine. Z1 - "danger zone," close proximity to the abdominal cavity; Z2 - mid anterior; Z3 - center of the disc; Z4 - mid posterior; Z5 - adjacent to the canal; A - extraforaminal; B - foraminal; C - posterolateral; D – central. Zone 1 is adjacent to the abdominal structures and great vessels, Zone 3 is the center of the disc, and Zone 5 is the region close to the canal. (C) projection of the hernia's location (seen on MRI during intraoperative radioscopy). Puncture planning in the transforaminal access (T2 axial cross-section in MRI): Z3: center of the disc - foraminal and extra-foraminal hernias; Z5: adjacent to the canal - central and posterolateral hernias. Source: author
Figure 3
Figure 3. (A) Intraoperative imaging of the endoscope’s position (from left to right: anteroposterior and profile lumbar spine radiography); (B) endoscopic view of “half and half”; (C) representation of the endoscope’s position using an anatomical model (L2).
Source: author
Figure 4
Figure 4. Radiological anatomy of the working sheath and endoscope facing the midline
Configuration of the endoscopic view after retreating the endoscope a few millimeters from ‘’half and half". (A) Intraoperative imaging by profile radiography of the lumbosacral spine; (B) endoscopic view. A: bevel base; B: bevel tip. On the lateral radiography, the bevel base (A) is on the facet line, so when we look at the video screen, everything adjacent to it will be the facet. The bevel tip (B) is touching the disc, so on the video screen, the disc will be seen adjacent to it. (C) Intraoperative imaging confirming the endoscope’s position (profile lumbar spine radiography); (D) endoscopic view of the working area; (E) anatomical model representation (L2) of the correct position of the endoscope and the reference triangle that will appear on the video feed. Inside-out approach: the base and the tip are inside the disc and when entered with the endoscope, only the disc is observed. Source: author
Figure 5
Figure 5. Interlaminar right and left-hand rule
Anatomical model representation of the endoscopic view with each hand demonstrating orientation of the interlaminar window content. The thumb represents the transversing nerve root (in the L5-S1 space it is the root of S1; in the L4-5 space it is the root of L5) and the other fingers represent the dural sac (A). When on the patient’s left side (B), overlap the left hand over the right hand. The left index finger is the L4 lamina, the left thumb is the L4 inferior articular process; the right thumb is the L5 superior articular process, and the right index finger is the L5 lamina (C). When on the patient’s right side, swap the positioning of the hands (D). Source: author
Figure 6
Figure 6. Clock position orientation
Two clocks are depicted, one is drawn on the patient’s back (A, B), while the other clock is represented on the video screen (C). When the camera’s head (where the buttons are located) is faceted along with the anterior part of the endoscope (mark) and both are perpendicular to the midline, the anatomical references of these two clocks overlap (D). Representation of the anatomy of the patient (E-G); it is used for spatial orientation, both by allowing redirection of the forceps toward the work site before introducing the endoscope and also by assisting in macroscopic positioning; if a herniated disc is located caudal to the forceps, we flip the opening of our instrument toward that direction (i.e., at 9 o’clock of the patient’s anatomy clock, as shown in F). (E) The clock is drawn on the patient’s back; (G) directing the endoscope through the guidance of the clock drawn on. CR: cranial; LM: medial; CD: caudal.
Figure 7
Figure 7. Joystick (hand movement), and cervical right and left-hand rule
In endoscopic surgery, whenever we want to visualize one side, we must move the instrument in the opposite direction. The “down hand” movement (A) projects the endoscope to a posterior orientation, being used when we want to avoid the facet; the “upper hand” movement (B) is used when working laterally (emerging root); the “foot hand” movement (D) is used when dissecting cranially; the “head hand” movement (C) when dissecting caudally. “Down hand”: for central and posterolateral hernias. “Upper hand”: for foraminal and extraforaminal hernias. “Head hand”: for hernias in the pedicle. “Foot hand”: for hernias in the axilla. Hand projections for cervical spine surgery. The thumb represents the cervical root, and the other fingers represent the medulla. The cervical roots have a more perpendicular output in relation to the spine, placing the transversing nerve root from 11 to 7 o’clock on the left (F) and from 1 to 5 o’clock on the right (E). PED: pedicle. Source: author

References

    1. Clinical outcomes of percutaneous endoscopic surgery for lumbar discal cyst. Ha SW, Ju CI, Kim SW, Lee S, Kim YH, Kim HS. J Korean Neurosurg Soc. 2012;51:208–214. - PMC - PubMed
    1. Decompression of lumbar lateral spinal stenosis: full-endoscopic, interlaminar technique (Article in German) Ruetten S, Komp M, Hahn P, Oezdemir S. Oper Orthop Traumatol. 2013;25:31–46. - PubMed
    1. Awake, endoscopic revision surgery for lumbar pseudarthrosis after transforaminal lumbar interbody fusion: technical notes. Telfeian AE, Moldovan K, Shaaya E, Syed S, Oyelese A, Fridley J, Gokaslan ZL. World Neurosurg. 2020;136:117–121. - PubMed
    1. Transforaminal endoscopic discectomy with foraminoplasty for the treatment of spondylolisthesis. Jasper GP, Francisco GM, Telfeian AE. https://www.painphysicianjournal.com/linkout?issn=&vol=17&page=E703 Pain Physician. 2014;17:703–708. - PubMed
    1. Clinical outcome of posterolateral endoscopic surgery for pyogenic spondylodiscitis: results of 15 patients with serious comorbid conditions. Ito M, Abumi K, Kotani Y, Kadoya K, Minami A. Spine (Phila Pa 1976) 2007;32:200–206. - PubMed

LinkOut - more resources