. 2023 Dec 20;17(1):26.
doi: 10.3390/ma17010026.

Residual Stresses in Ribbed Reinforcing Bars

Affiliations

Residual Stresses in Ribbed Reinforcing Bars

Tobias Robl et al. Materials (Basel). .

Abstract

Ribbed reinforcing bars (rebars) are used for the reinforcement of concrete structures. In service, they are often subjected to cyclic loading. In general, the fatigue performance of rebars may be influenced by residual stresses originating from the manufacturing process. Knowledge about residual stresses in rebars and their origin, however, is sparse. So far, residual stress measurements are limited to individual stress components, viz., to the non-ribbed part of the rebar surface. At critical points of the rebar surface, where most of the fatigue cracks originate, i.e., the foot radius regions of transverse ribs, the residual stress state has not yet been investigated experimentally. To extend the knowledge about residual stresses in rebars within the scope of this work, residual stress measurements were carried out on a rebar specimen with a diameter of 28 mm made out of the rebar steel grade B500B. In addition, numerical simulations of the TempCoreTM process were carried out. The results of the experimental investigations show tensile residual stresses in the core and the transition zone of the examined rebar specimen. Low compressive residual stresses are measured at the non-ribbed part of the rebar surface, while high compressive residual stresses are present at the tip of the transverse ribs. The results of the numerical investigations are in reasonable accordance with the experimental results. Furthermore, the numerical results indicate moderate tensile stresses occurring on the rebar surface in the rib foot radius regions of the transverse ribs. High stress gradients directly beneath the rebar surface, which are reported in the literature and which are most likely related to a thin decarburized surface layer, could be reproduced qualitatively with the numerical model developed.

Keywords: constitutive modeling; manufacturing process; reinforcing steel; residual stresses; stress concentration.


Conflict of interest statement

The authors declare no conflict of interest. The funders had no role in the design of the study; in the collection, analysis, or interpretation of data; in the writing of the manuscript; or in the decision to publish the results.

Figures

Figure 1
Figure 1
Idealized geometry of rebar steel grade B500B with longitudinal ribs according to DIN-488-2 [1]: (a) overall view, (b) cross-section of transverse rib and (c) longitudinal section of transverse rib.
Figure 2
Figure 2
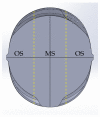
Idealized CAD-representation of a rebar (cross-section): middle segment used by Volkwein et al. [7] for residual stress measurements indicated by MS, outer segments indicated by OS.
Figure 3
Figure 3
Examined rebar specimen with locations A-J for the residual stress measurements on the rebar surface ((top) rebar side with alternating ribs, (bottom) rebar side with parallel ribs): the periodic unit cell extracted from the rebar specimen, which was used for the residual stress measurements in the core and in the transition zone of the rebar, is highlighted in yellow (projection of the measurement surface for the residual stress measurements in the core and in the transition zone depicted as solid line).
Figure 4
Figure 4
Residual stress measurements in the core and the transition zone of the extracted unit cell: electropolishing spots and selected evaluation locations highlighted in black and blue on an idealized CAD representation of the rebar specimen used (left) as well as the results of the residual stress measurements, i.e., tangential stress component, σtan, as a function of the radius, r (right).
Figure 5
Figure 5
Idealized CAD representation of the rebar specimen used for the experimental analyses: the plane, in which the residual stress measurements in the core and the transition zone, the microstructure analysis, the hardness measurements and the EBSD measurements were conducted, is highlighted in black on the left side and displayed in sectional view on the right side. The path along which the microstructure analysis and the hardness measurements were carried out in the measurement plane is highlighted in yellow. The measurement location, at which the texture analysis was conducted, is highlighted in white. The local coordinate system of the measurement location is highlighted in red, whereas RD, AD and TD indicate the local radial, axial and tangential directions, respectively.
Figure 6
Figure 6
Micrographs at different locations of the cross-section of the rebar specimen: (a) thin surface layer directly beneath the rebar surface with differing microstructure, (b) rim with martensitic microstructure, (c) transition zone with bainitic microstructure and (d) core with ferritic–pearlitic microstructure.
Figure 7
Figure 7
Hardness, H, as a function of the depth, Δ, (measured from the rebar surface) evaluated along the path highlighted yellow in Figure 5 (right).
Figure 8
Figure 8
Inverse pole figure maps (AD||[hkl]) of martensite (left) and the reconstructed austenitic phase (right) [24,25].
Figure 9
Figure 9
Results of austenite parent grain reconstruction, i.e., grain boundaries of reconstructed prior austenite grains, and results of the martensite variants analysis, i.e., individual martensite variants present in the prior austenite grains [24,25].
Figure 10
Figure 10
Inverse pole figures for the martensite phase (top row) and the austenite phase (bottom row) showing the inverse pole density function evaluated in the tangential, radial and axial directions of the specimen, respectively (see Figure 5 and Figure 8) [24,25].
Figure 11
Figure 11
Different types of idealized model geometries, including specific evaluation paths: (a,b) periodic unit cell (rebar sides with alternating, viz., parallel ribs), (c) periodic unit cell with middle segment (highlighted in orange) and outer segments and (d) axisymmetric geometry. In subfigures (a,d), the different segments of path 3 and 8 are separated by gray dots. For paths 1, 2, 3, 4, 5, 9 and 10, the axial and tangential directions correspond to the global y- and x-directions, respectively. For paths 6, 7 and 8, the axial and tangential directions correspond to the global y- and z-directions.
Figure 12
Figure 12
Martensite hardness (HV) as a function of the tempering time, t, and the tempering temperature, T, for the rebar steel grade B500B according to the model of Kang et al. [37] (isothermal temperature control, experimentally determined hardness values for 0.2 wt.% carbon steel with 0.8 wt.% Mn after tempering for 3600 s at different tempering temperatures highlighted in red [38]).
Figure 13
Figure 13
Time–temperature–precipitation (TTP) diagram of cementite in martensite for the rebar steel grade B500B, including the hardness curves for hardness values of 500 HV and 355 HV (hardness curves according to Equations (2) and (3)): transformation start (transformation ratio 0.001) and transformation end (transformation ratio 0.990) shown for two different dislocation densities (1.0×10¹⁵ m2, 1.0×10¹³ m2).
Figure 14
Figure 14
Yield stress of austenite, Yaus, as a function of the temperature, T, for the rebar steel grade B500B and the steel grade SCr420 according to the model of Eres–Castellanos et al. [54].
Figure 15
Figure 15
Numerical results for path 1, i.e., for (a) the periodic unit cell, at t=3000 s: (b) phase fractions of martensite, bainite, pearlite and ferrite, zmar, zbpf, as well as (c) martensite hardness, Htmar, and tempering ratio, Rtem, as a function of the radius, r.
Figure 16
Figure 16
Numerical results for t=3000 s: (ac) axial and tangential residual stress components, σax and σtan, as a function of the radius, r, and as a function of the normalized path variable, x¯ (evaluation for paths 1, 2, 3, 4 and 5, i.e., for the periodic unit cell, see subfigures (d,e)). In subfigure (a), the results of the residual stress measurements of Hameed et al. [11] at a depth of 0.3 mm are given additionally (depth measured from the rebar surface, measurement location between two alternating ribs). In subfigure (c), the individual sections of path 3 (see Figure 11) are separated by vertical gray lines (c: outer surface of base cylinder; r: rib foot radius; f: rib flank).
Figure 17
Figure 17
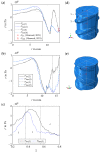
Numerical results: (a) tangential residual stress component, σtan, as a function of the radius, r, (evaluation for path 9, i.e., for the periodic unit cell, for t=3000 s and after the relaxation step; see subfigure (c)) and (b) axial residual stress component, σax, as a function of the radius, r, (evaluation for path 10, i.e., for the periodic unit cell, for t=3000 s and after the relaxation step; see subfigure (d)). In subfigure (a), additionally the results from Section 3.1.2 are given (see also Figure 4 (right)), and in subfigure (b), the results of Volkwein et al. [7] are given (see also Section 2).
Figure 18
Figure 18
Numerical results for t=3000 s: (a,b) axial and tangential residual stress components, σax and σtan, as a function of the radius, r. Evaluation for paths 1 and 2, i.e., for the periodic unit cell, (see subfigure (c)) as well as for paths 6 and 7, i.e., for the axisymmetric geometry (see subfigure (d)).
Figure 19
Figure 19
Numerical results for t=3000 s: axial and tangential residual stress components, σax and σtan, as a function of depth, Δ, (measured from the rebar surface), viz., the normalized path variable, x¯, once neglecting and once considering the altered material behavior (AM) of the thin surface layer (evaluation for paths 6, 7 and 8, i.e., the axisymmetric geometry; see subfigure (d)). In subfigure (c), the individual sections of path 3 (see Figure 11d) are separated by vertical gray lines (c: outer surface of base cylinder; r: rib foot radius; f: rib flank). In subfigures (a,b), additionally, the results of the residual stress measurement from Section 3.1.1 are shown. The mean value determined in Section 3.1.1 for all measurements between parallel and alternating ribs is indicated as MV. The letters P and A indicate whether a specific measurement value has been determined on the rebar side with parallel or alternating ribs.
Figure 20
Figure 20
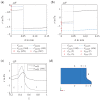
Numerical results: (a) evolution of temperature, T, and (b,c) evolutions of the phase fractions, zi, at selected locations of path 6, i.e., for the axisymmetric geometry (see subfigure (d)).
Figure 21
Figure 21
Numerical results for various cooling times, ti: (a) axial stress component, σax, as a function of the radius, r, (evaluation for path 6, i.e., the axisymmetric geometry, altered material behavior of the thin surface layer not considered in the model), (b) axial stress component, σax, as a function of the depth, Δ, (depth measured from the rebar surface, evaluation for path 6, altered material behavior of the thin surface layer considered in the model) and (c) path locations.

References

    1. DIN . Reinforcing Steels—Reinforcing Steel Bars. Beuth; Berlin, Germany: 2009.
    1. DIN . Reinforcing Steels—Part 1: Grades, Properties, Marking. Beuth; Berlin, Germany: 2009.
    1. Robl T., Wölfle C.H., Shahul Hameed M.Z., Rappl S., Krempaszky C., Werner E. An approach to predict geometrically and thermo-mechanically induced stress concentrations in ribbed reinforcing bars. Metals. 2022;12:411. doi: 10.3390/met12030411. - DOI
    1. Economopoulos M., Respen Y., Lessel G., Steffes G. Application of the tempcore process to the fabrication of high yield strength concrete-reinforcing bars. Metall. Rep. 1975;45:1–17.
    1. Noville J.F. TEMPCORE, the most convenient process to produce low cost high strength rebars from 8 to 75 mm; Proceedings of the METEC & 2nd ESTAD; Düsseldorf, Germany. 15–19 June 2015.

LinkOut - more resources