. 2018:36:10.1116/1.5033568.
doi: 10.1116/1.5033568.

Quantum-based vacuum metrology at NIST

Affiliations

Quantum-based vacuum metrology at NIST

Julia Scherschligt et al. J Vac Sci Technol A. 2018.

Abstract

The measurement science in realizing and disseminating the unit for pressure in the International System of Units (SI), the pascal (Pa), has been the subject of much interest at NIST. Modern optical-based techniques for pascal metrology have been investigated, including multi-photon ionization and cavity ringdown spectroscopy. Work is ongoing to recast the pascal in terms of quantum properties and fundamental constants and in so doing, make vacuum metrology consistent with the global trend toward quantum-based metrology. NIST has ongoing projects that interrogate the index of refraction of a gas using an optical cavity for low vacuum, and count background particles in high vacuum to extreme high vacuum using trapped laser-cooled atoms.


Figures

FIG. 1.
FIG. 1.
A schematic diagram of a cavity ring-down spectroscopy apparatus. The figure is reproduced from van Zee et al.
FIG. 2.
FIG. 2.
A plot of the lowest number density measurable during a one second measurement interval as a function of cross section for three sensitivities: A – as demonstrated in van Zee et al. (10 cm cavity with a mirror reflectivity of 0.999996, B—shot noise limit for these experiments; C—shot noise limit for a1 m long cavity mirror reflectivity of 0.99999, and 100 μW of laser power exiting the cavity. The figure is reproduced from van Zee et al.
FIG. 3.
FIG. 3.
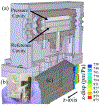
(a) Dual FP cavity refractometer in its thermal/vacuum apparatus: the pressure measurement cavity is in gas, and the reference cavity is ion-pumped to high-vacuum. (b) photograph of the refractometer. (c) Distortions in cavity lengths per pascal of pressure on the measurement cavity when the reference cavity is at vacuum. The figure is reproduced from Egan et al.
FIG. 4.
FIG. 4.
Disagreement in pressure as measured by two separate laser refractometers (pFP) and mercury ultrasonic manometer (pUTM). The dashed lines are the manometer uncertainty. The figure is reproduced from Egan et al.
FIG. 5.
FIG. 5.
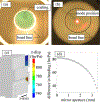
Correcting FLOC distortion via finite-element analysis and an inspection of the mode position on the mirror. Pane (a) is an image of the mirror showing the bond interface. Through edge-detection, an estimate can be made of the area upon which the pressure acts. In (b), another image is taken with a laser beam aligned to the cavity resonance. By combining these two images, an estimate of the location of the beam on the mirror surface is made. The result of a finite-element analysis is shown in (c) datasheet values were used for elastic properties of ULE glass, and the geometry was estimated by the bond line in image (a). The difference in mirror bending calculated by finite-element is extracted as a profile, shown in pane (d).
FIG. 6.
FIG. 6.
(a) MIRE apparatus and (b) Refractometry cells of three different lengths but which are otherwise nominally identical. Each borehole has a gas inlet and outlet. (Left to right, the cell lengths are 18 mm, 134 mm, 254 mm.)
FIG. 7.
FIG. 7.
Panel (a): Atom number decay in a magneto-optical trap (CAVS-MOT) data (circles) are fit to decay curves (solid curves) which are solutions to Eq. 14 and include single-body and two-body interactions. Panel (b): Pressure in the CAVS-MOT as determined by the data in panel (a) converted to pressure using semi-classical cross section estimates plotted versus an uncalibrated ion gauge.
FIG. 8.
FIG. 8.
A 3D-model of the PICO-VS, including a model of the triangular grating chip, reproduced from Eckel et. al.
FIG. 9.
FIG. 9.
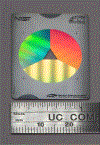
Photograph of the prototype CCT triangular grating chip, with centimeter ruler.
FIG. 10.
FIG. 10.
Silicon nitride membrane mechanical damping gauge. The ringdown time for a 2 mm square by 50 nm thick, high-tensile-stress membrane is measure via piezoelectric actuation and optical detection. Inset shows fundamental out-of-plane vibrational mode.
FIG. 11.
FIG. 11.
The (blue) trace was recorded from a piezo electric transducer mounted perpendicular to the shock front. The Mach speed of the shock was measured to be 1.8. The initial conditions were 1.9 MPa and atmospheric pressure using Nitrogen.

References

    1. Dylla HF, J. Vac. Sci. Technol. A 21, S25 (2003).
    1. Newell DB, Phys. Today 67, 35 (2014).
    1. Possolo A, Schlamminger S, Stoudt S, Pratt JR, and Williams CJ, Metrologia 55, 29 (2017).
    1. Newell DB, Cabiati F, Fischer J, Fujii K, Karshenboim SG, Margolis HS, de Mirandés E,Mohr J, Nez F, Pachucki K, Quinn TJ, Taylor BN, Wang M, Wood BM, and Zhang Z, Metrologia 55, L13 (2018).
    1. Lafferty JM, J. Vac. Sci. Technol 9, 101 (1972).

LinkOut - more resources