Review
. 2024 Jul 12;17(14):3455.
doi: 10.3390/ma17143455.

The Main Failure Modes of Hot-Work Die Steel and the Development Status of Traditional Strengthening Methods and Nano-Strengthening Technology

Affiliations
Review

The Main Failure Modes of Hot-Work Die Steel and the Development Status of Traditional Strengthening Methods and Nano-Strengthening Technology

Hong-Yu Cui et al. Materials (Basel). .

Abstract

As an important part of die steels, hot-work die steels are mainly used to manufacture molds made of solid metal or high-temperature liquid metal from heating to recrystallization temperature. In view of the requirements for mechanical properties and service life for hot-work die steel, it is conducive to improve the thermal fatigue resistance, wear resistance, and oxidation resistance of hot work die steel. In this review, the main failure modes of hot-work die steel were analyzed. Four traditional methods of strengthening and toughening die steel were summarized, including optimizing alloying elements, electroslag remelting, increasing the forging ratio, and heat treatment process enhancement. A new nano-strengthening method was introduced that aimed to refine the microstructure of hot-work abrasive steel and improve its service performance by adding nanoparticles into molten steel to achieve uniform dispersion. This review provides an overview to improve the service performance and service life of hot work die steel.

Keywords: failure modes; hot-work die steel; nano-strengthening technology; traditional strengthening methods.


Conflict of interest statement

Ai-Min Li employed by Zhanghang Shangda Superalloys Materials Co., Ltd., Cheng-Gang Wang and Zhi-Gang Li employed by FAW Foundry Co., Ltd., Jie Kang employed by Jilin Liyuan Precision Manufacturing Co., Ltd., Ming Zhu employed by Zhenjiang Xianfeng Automotive Parts Co., Ltd. The authors declare no conflicts of interest.

Figures

Figure 6
Figure 6
(a) X-ray diffractograms of the mixture before adding Fe powder, after adding Fe powder, and after heat treatment. (b) SEM image of nanopowder morphology. EDX analysis of different substances in (b): (c) particles; (d) matrix [87]. Schematic diagram of SLM equipment: (e) SLM device system; (f) laser scanning strategy [89]. (g) Principle diagram of the technology combining multi-point-dispersed supply processing and electromagnetic stirring [92]. Flow chart of using master alloy to prepare nanoparticle reinforced steel: (h) casting ladle; (i) dispersion process [94].
Figure 1
Figure 1
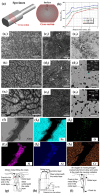
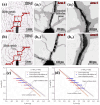
(a) Schematic diagram of experimental sample. (b) Hardness change curve after different thermal cycles. Macroscopic morphology of surface cracks after different thermal cycles: (c1) 100 times; (d1) 1500 times; (e1) 3000 times. SEM morphology images of surface cracks after different thermal cycles: (c2) 100 times; (d2) 1500 times; (e2) 3000 times. TEM morphology images of surface cracks after different thermal cycles: (c3) 100 times; (d3) 1500 times; (e3) 3000 times [9]. (f) SEM image of thermal fatigue cracks in the test steel after 20,000 cycles of immersion testing. Distribution maps of selected alloying elements around thermal fatigue cracks: (f1) Fe; (f2) O; (f3) Si; (f4) Al; (f5) Cr. (gi) Schematic diagram of the mechanism of the effect of oxidation on hot crack growth [11].
Figure 2
Figure 2
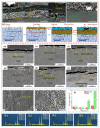
Microscopic image of the longitudinal section of H13 die steel after hot extrusion: (a) oxide layer; (b) metallographic microstructure; (c) schematic diagram of the mechanism of oxidation wear [19]. Cross-sectional morphology of H21 steel under different conditions: (d) 150 N, 400 °C, and 50 r min−1; (e) 150 N, 400 °C, and 100 r min−1; (f) 150 N, 500 °C, and 50 r min−1; (g) 150 N, 500 °C, and 100 r min−1; (h) 150 N, 600 °C, and 50 r min−1; (i) 150N, 600 °C, and 100 r min−1 [20]. SEM topography and EDS images of the worn surface of high-speed steel pins on prefabricated oxidized disks at different temperatures: (j) 850 °C; (k) 900 °C [21]. (l) Histogram of wear rate of SDCM-S steel and H13 steel at 400–700 °C [22].
Figure 3
Figure 3
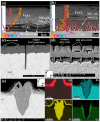
SEM–BSE and SEM–EDS line scan images of different steel types: (a) 3Cr3Mo2NiW steel; (b) 3CrNi3Mo steel [23]. Cross-sectional SEM images of mold steel specimens after 30,000 thermal fatigue cycles: (c) before electrolytic etching; (d) after electrolytic etching. (e) Cross-sectional scanning electron microscope image of microcracks formed on a coated sample after 30,000 thermal fatigue cycles, and SEM images of Al, Fe, O, and Cr distributions [28].
Figure 4
Figure 4
The stability of the phase with increasing temperature under equilibrium conditions: (a) 5Cr5Mo2 steel; (b) H13 steel. Elemental change curve of related phases of the 5Cr5Mo2 steel: (c) MC; (d) M2C; (e) M23C6; and the H13 steel: (f) MC; (g) M6C; (h) M23C6 [39].
Figure 5
Figure 5
Schematic diagram of the mechanism of different remelting processes: (a) ESR; (b) MC-ESR. The effect of ASMF on different materials during the remelting process: (c) oblique dendrites; (d) axial dendrites; (e) molten pool; (f) top view [49]. Molten pool profiles during different remelting processes: (g) ESR; (h) ESR-CDS. Schematic diagram of solidification behavior during different remelting processes: (i) ESR; (j) ESR-CDS [50].
Figure 7
Figure 7
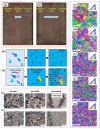
Macroscopic images of SA 106B carbon steel: (a) without nano-TiC particle addition; (b) with nano-TiC particle addition [100]. Inverse pole figure (IPF) map of RAFM steel with different ZrC contents: (c) 0 wt.%; (d) 0.25 wt.%; (e) 0.5 wt.%; (f) 0.75 wt.%; (g) 1.0 wt.% [93]. Schematic diagram of the microstructure evolution of 310S stainless steel during the solidification process: (h) without nanoceramic particle additives; (i) with nanoceramic particle additives [101]. Schematic diagram of the microstructure of SA-106B carbon steel after casting, hot rolling, and normalizing: (j) without adding TiC; (k) adding 0.1 wt% TiC [102].
Figure 8
Figure 8
Stress–strain curves of stainless steel with different contents of nano-TiC-316L: (a) engineering stress–strain curve; (b) real stress–strain curve [104]. (c) Strain–stress curve of austenitic steel at room temperature and 650 °C. Comparison of the strength of Y2O3-reinforced austenitic heat-resistant steel and commercial Super304H steel at different temperatures: (d) room temperature; (e) 650 °C [105]. Schematic diagram of fracture of TiC-reinforced high-temperature martensitic steel at different temperatures: (f) 25–500 °C; (g) 500–600 °C; (h) >600 °C [106].
Figure 9
Figure 9
Microscopic diagram of thermal fatigue cracks at the preset notch tip of the new high Cr martensitic mold steel after 3000 thermal fatigue cycles at 650 °C to 20 °C: (a) without adding nanoparticles; (b) adding 0.02 wt.% TiC+TiB2 [94]. Probability S–N curve at the specified level: (c) confidence (C) = 99%, probability (P) = 99%; (d) C = 99%, P = 50% [107].
Figure 10
Figure 10
SEM micrographs of longitudinal sections of the worn surfaces of different steel types: (a) commercial wear-resistant steel (Hardox450); (b) bainitic wear-resistant steel (BS) [113]. Schematic diagram of the impact abrasive wear mechanism of high-manganese steel under different treatments: (c) without tempering treatment; (d) after tempering treatment [114].
Figure 11
Figure 11
(a) Images of weight changes over time of different test steels at 1023 K [118]. Weight changes in 304SS steel with different TiC contents: (b) weight change curve with time (c) parabolic graph of weight change with time. Oxidation cross-sectional images of different TiC contents at different times: (d) 304SS, 48 h; (e) 304SS–6TiC, 48 h; (f,g) 304SS, 96 h; (h,i) 304SS–2TiC, 96 h; (j,k) 304SS–6TiC, 96 h [119].

References

    1. Wang H., Feng H., Li H., Zhang S., Zhu H., Jiao W., Jiang Z. Thermal Stability and Softening Mechanism of a New Type of High Nitrogen Hot-Work Die Steel 3Cr5Mo2SiVN. Mater. Charact. 2024;210:113789. doi: 10.1016/j.matchar.2024.113789. - DOI
    1. Li C.-D., Wang W.-X., Qiu F., Zhang H., Shu S.-L., Li T.-Y., Jiang Q.-C. Application of Ceramic Nanoparticles in Microstructure Manipulation and Simultaneously Strengthening Toughness and Wear Resistance of Tool and Die Steels. Ceram. Int. 2023;49:16661–16672. doi: 10.1016/j.ceramint.2023.02.027. - DOI
    1. Chang F., Zhang H., Gao Y.-L., Shu S.-L., Qiu F., Jiang Q.-C. Microstructure Evolution and Mechanical Property Enhancement of High-Cr Hot Work Die Steel Manipulated by Trace Amounts of Nano-Sized TiC. Mater. Sci. Eng. A. 2021;824:141788. doi: 10.1016/j.msea.2021.141788. - DOI
    1. Chang F., Li C.-D., Yang H.-Y., Qiu F., Shu S.-L., Chen L.-Y., Jiang Q.-C. Hot-Work Die Steel with Superior Mechanical Properties at Room and High Temperatures Prepared via a Combined Approach of Composition Design and Nanoparticle Modification. J. Mater. Res. Technol. 2023;25:1748–1760. doi: 10.1016/j.jmrt.2023.06.024. - DOI
    1. Girisha V.A., Joshi M.M., Kirthan L.J., Bharatish A., Hegde R. Thermal Fatigue Analysis of H13 Steel Die Adopted in Pressure-Die-Casting Process. Sādhanā. 2019;44:148. doi: 10.1007/s12046-019-1111-3. - DOI

LinkOut - more resources