Review
. 2025 Mar 10;17(3):e80349.
doi: 10.7759/cureus.80349. eCollection 2025 Mar.

Supine Bridge Exercise: A Narrative Review of the Literature (Part I)

Affiliations
Review

Supine Bridge Exercise: A Narrative Review of the Literature (Part I)

Saverio Colonna et al. Cureus. .

Abstract

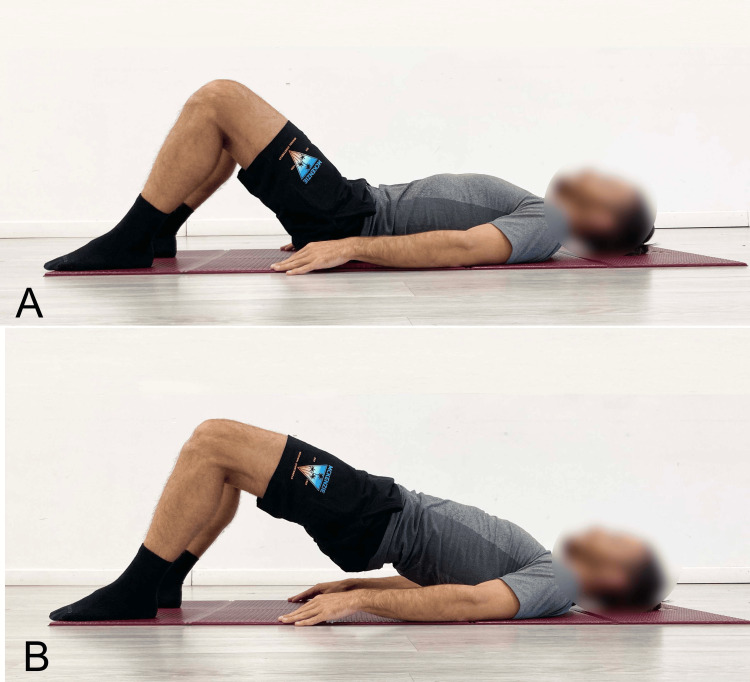
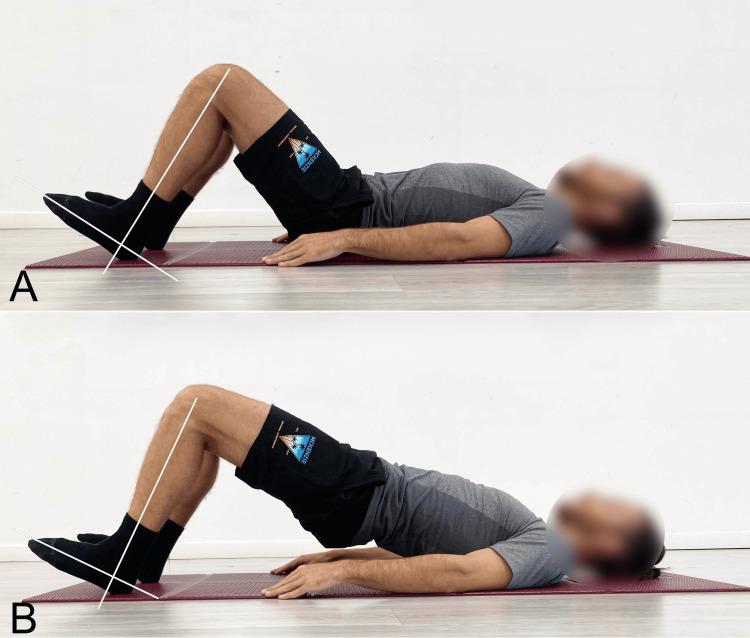
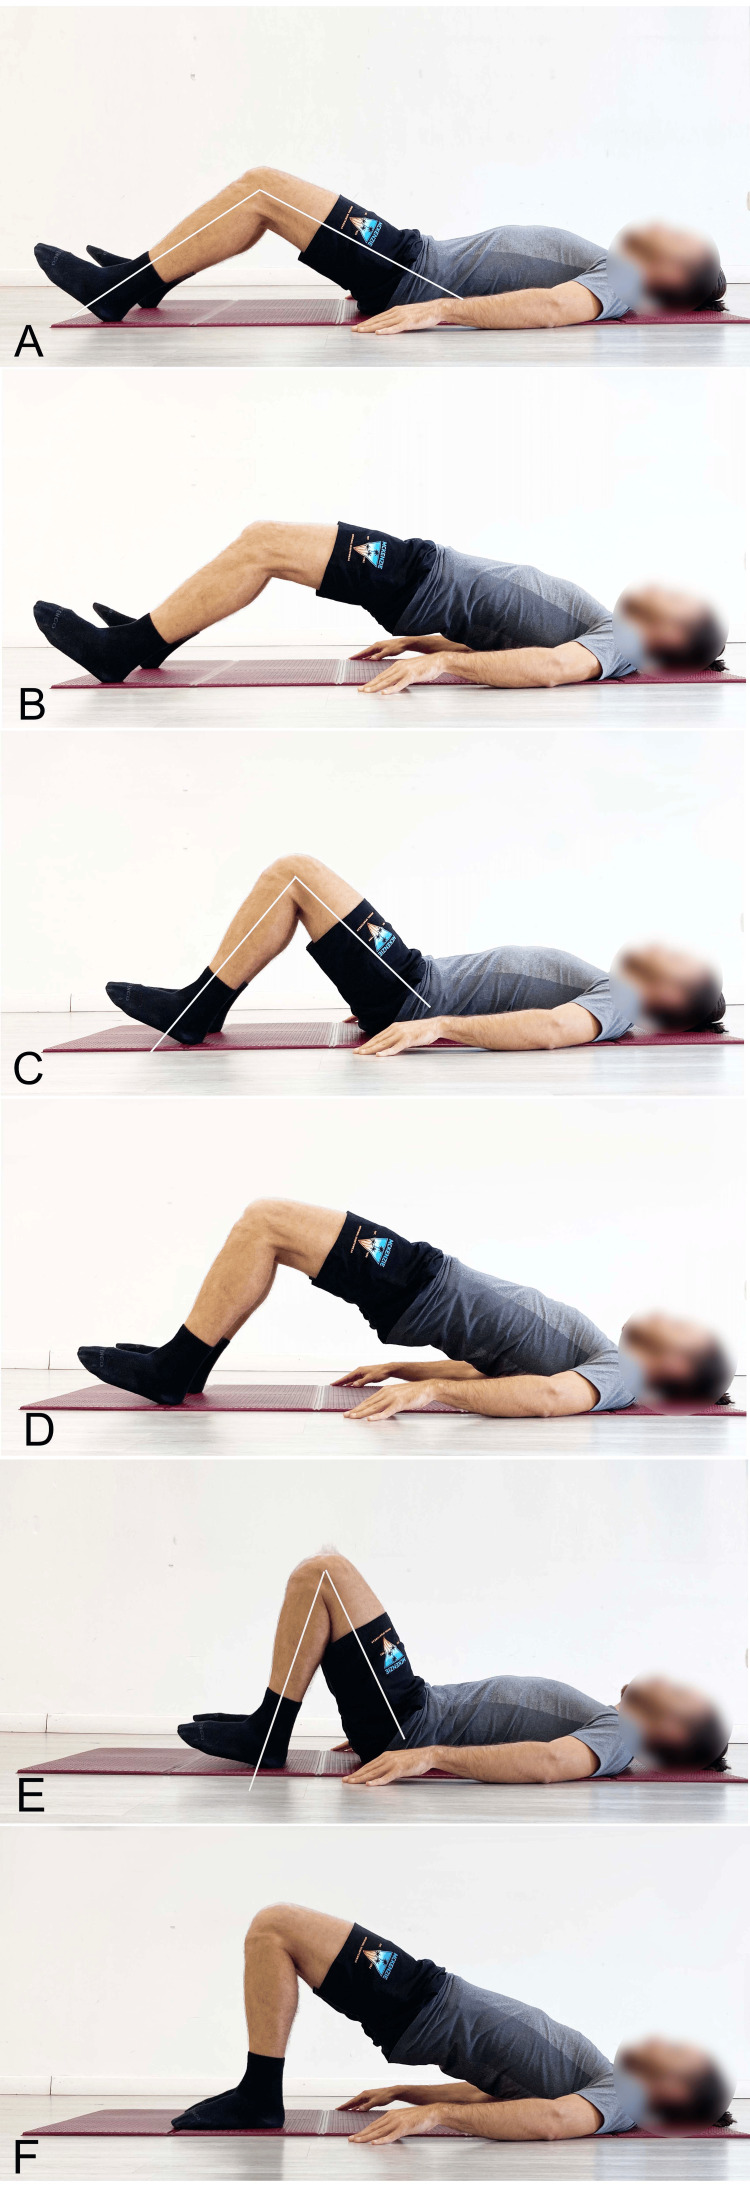
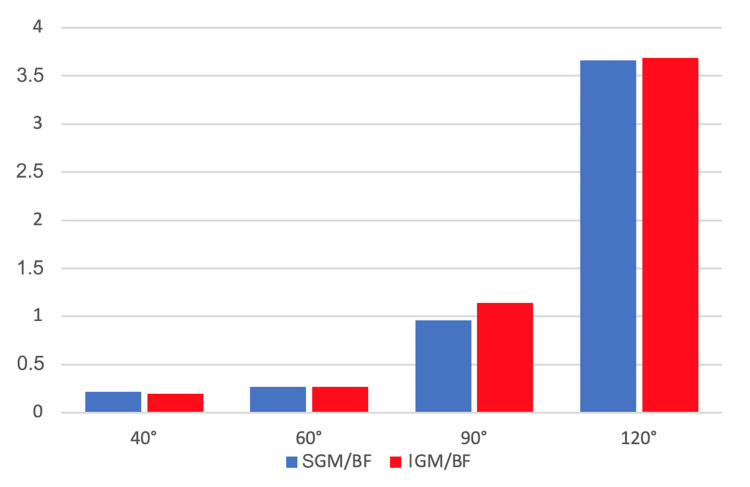
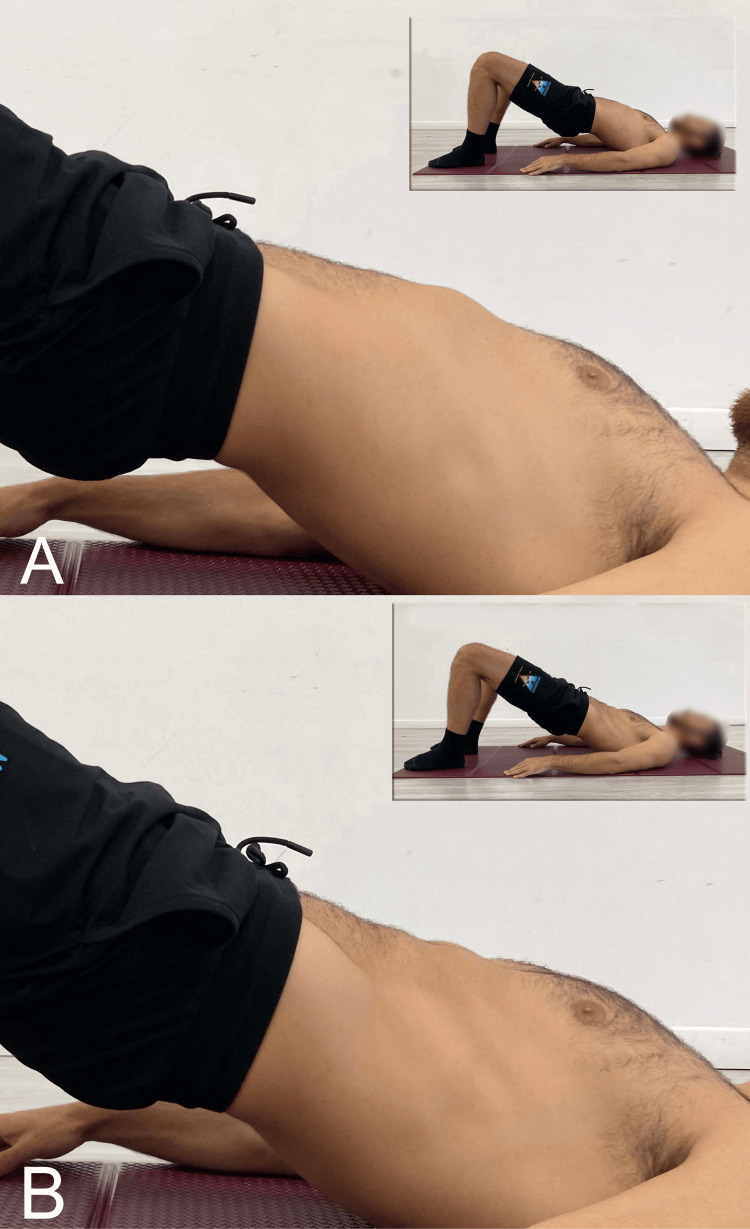
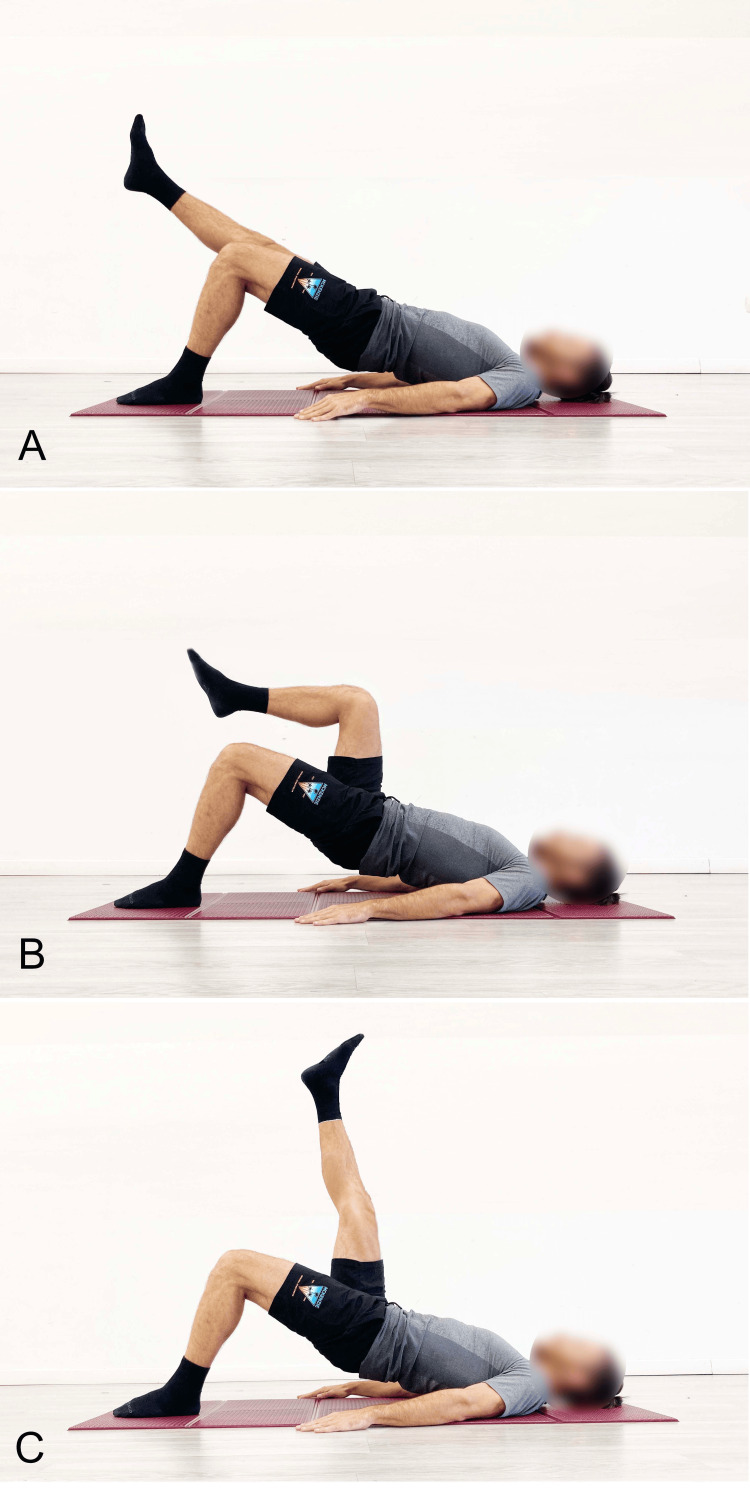
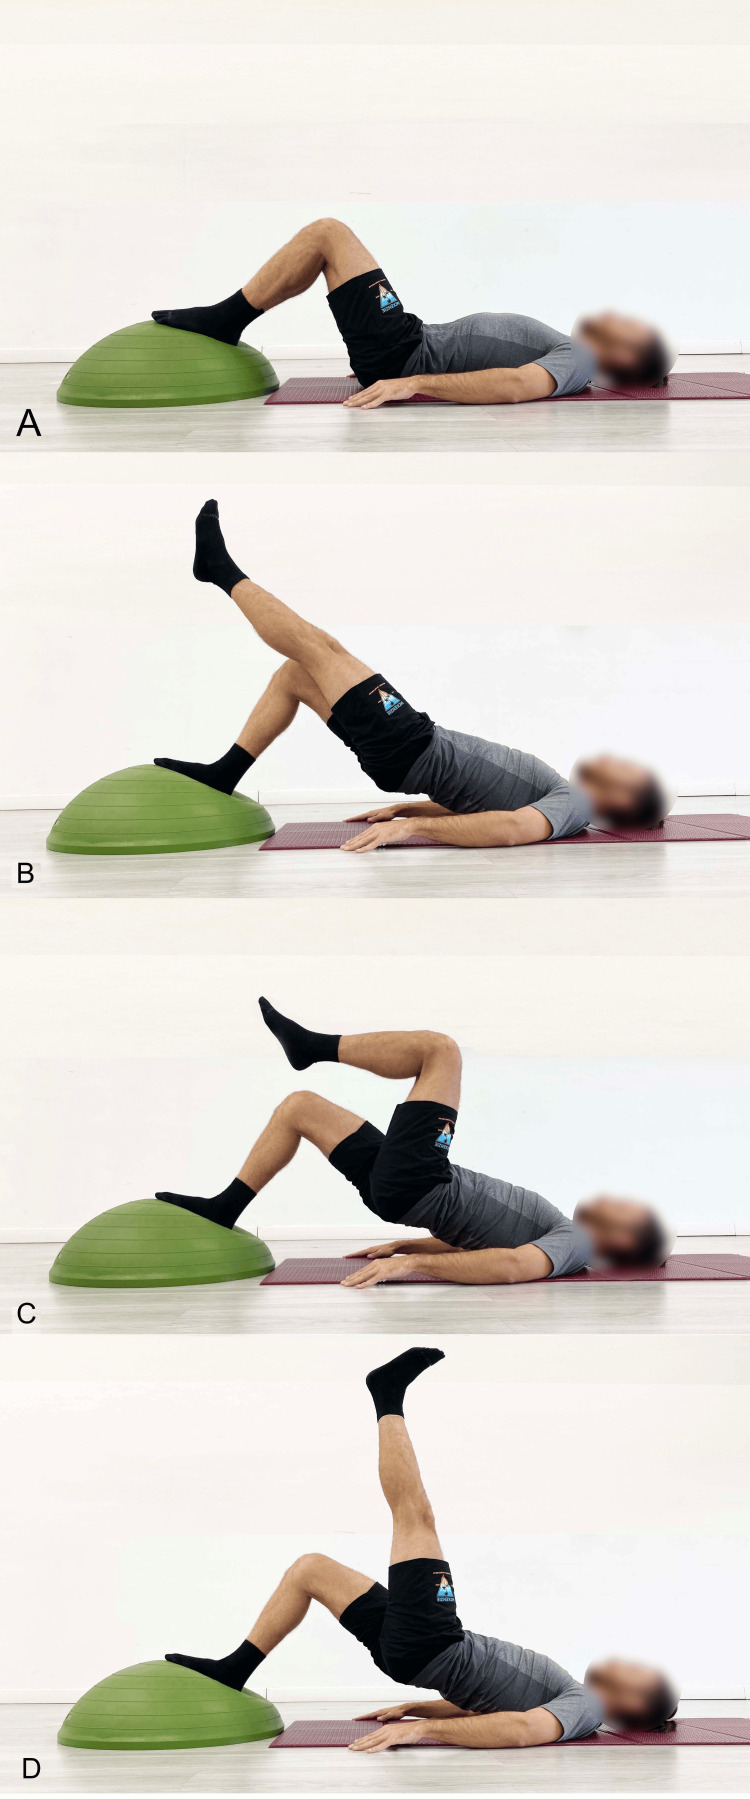
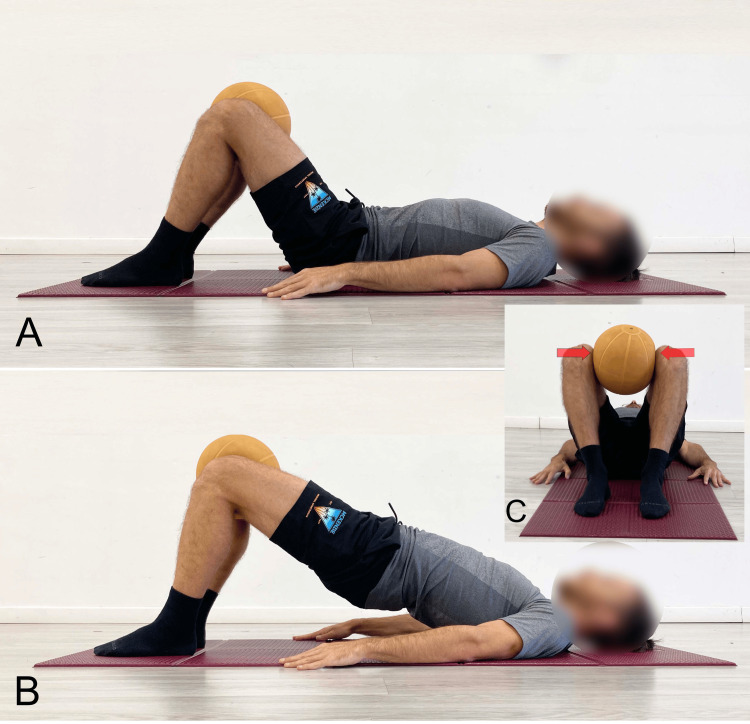
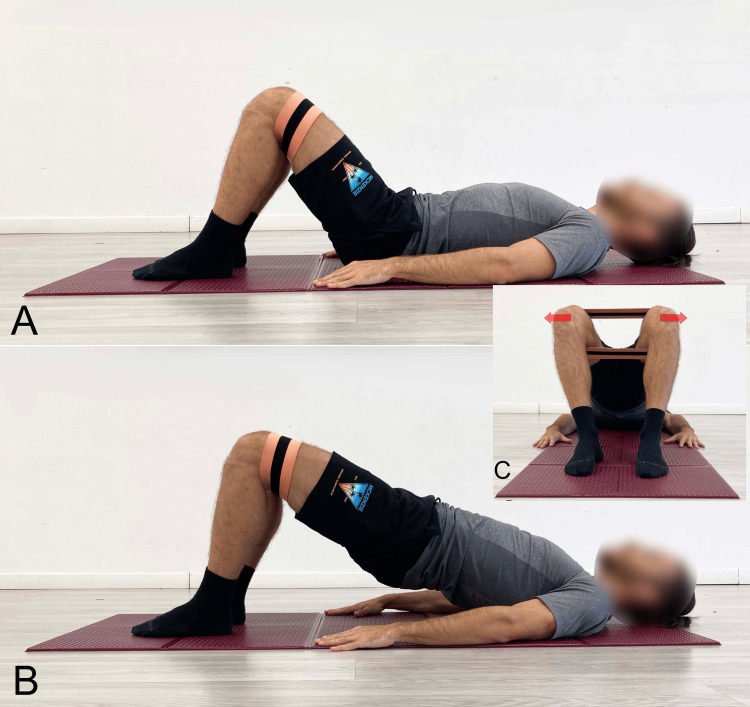
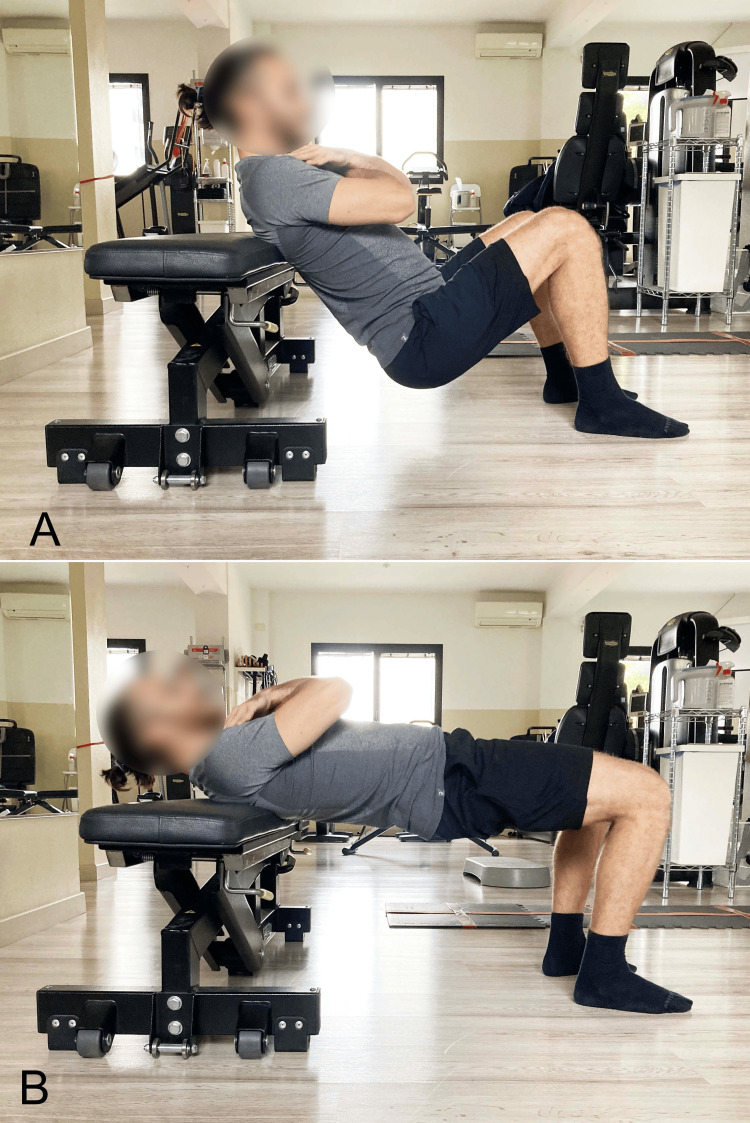
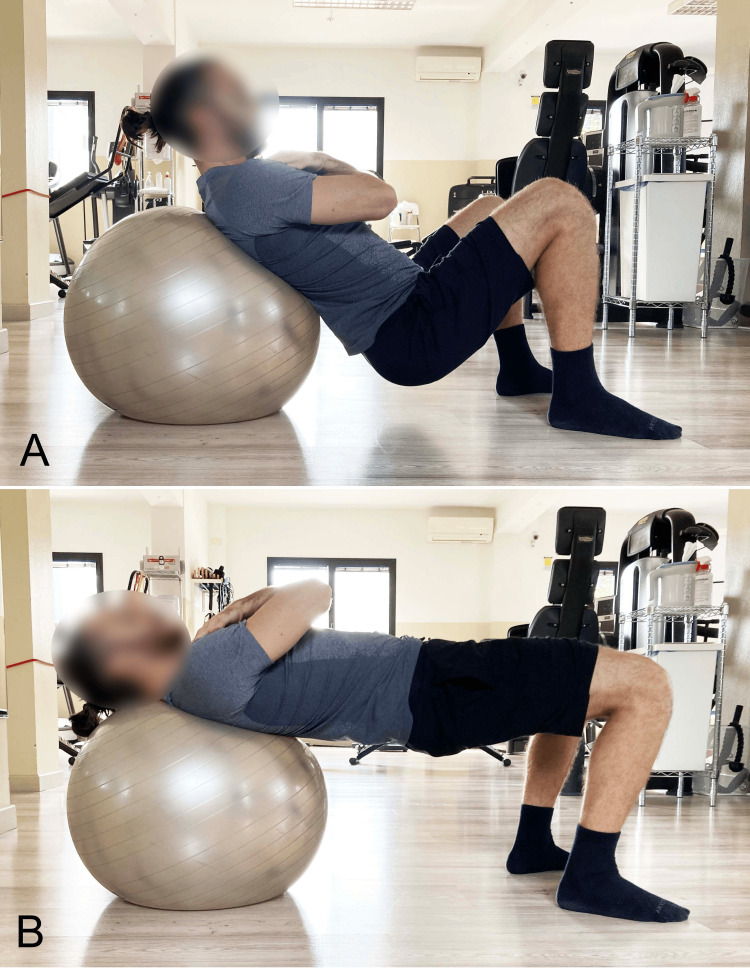
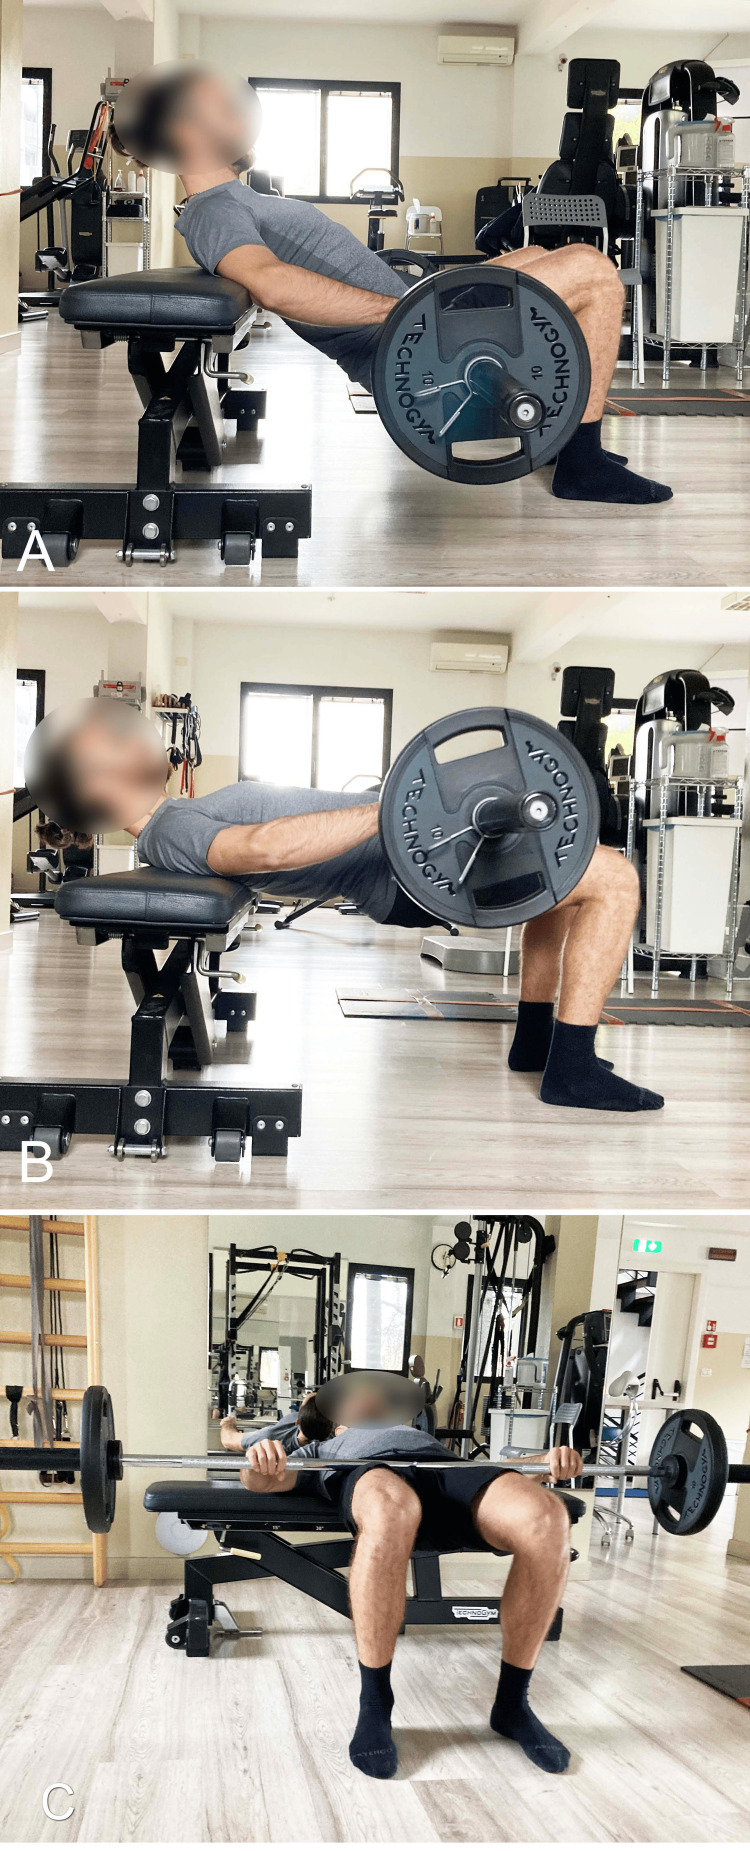
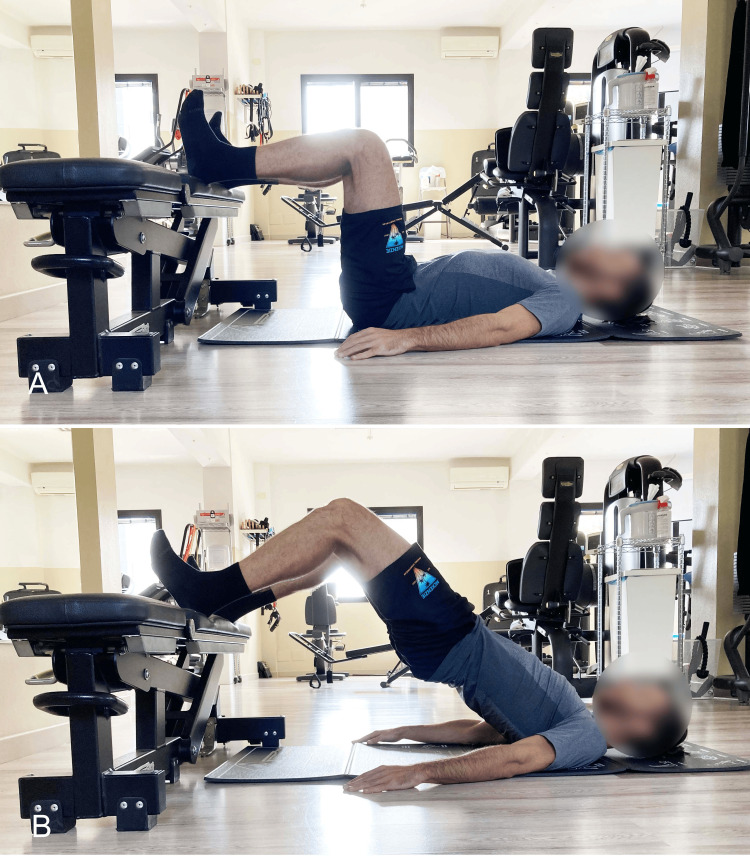
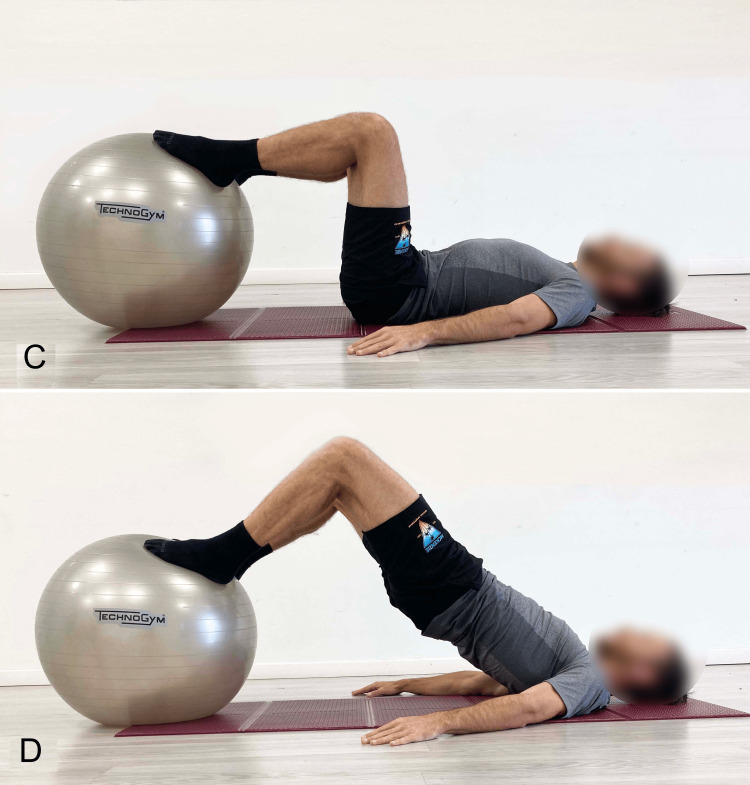
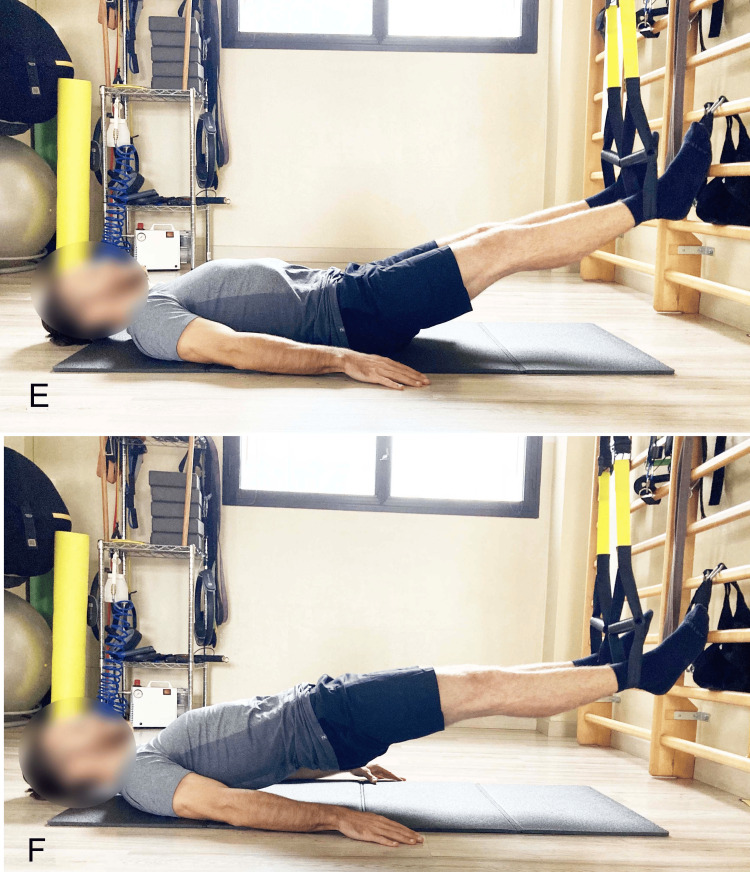
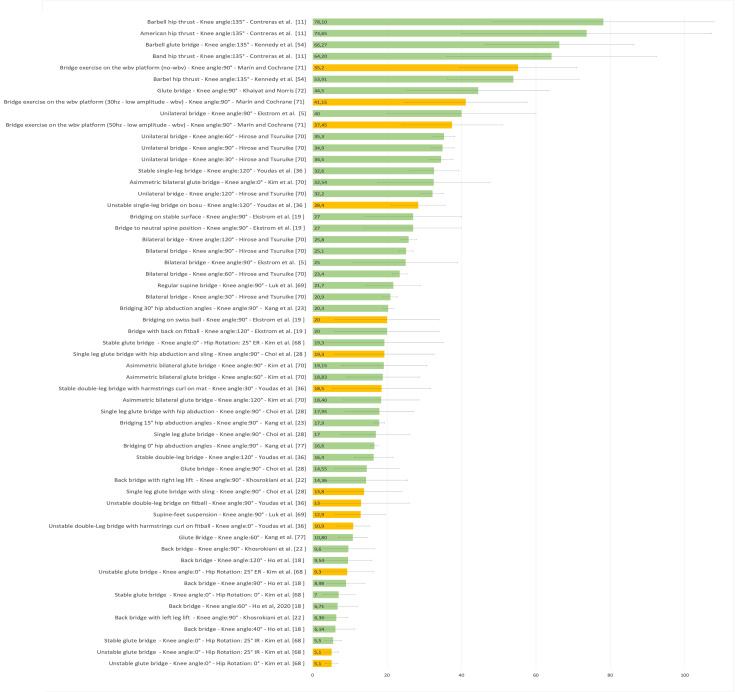
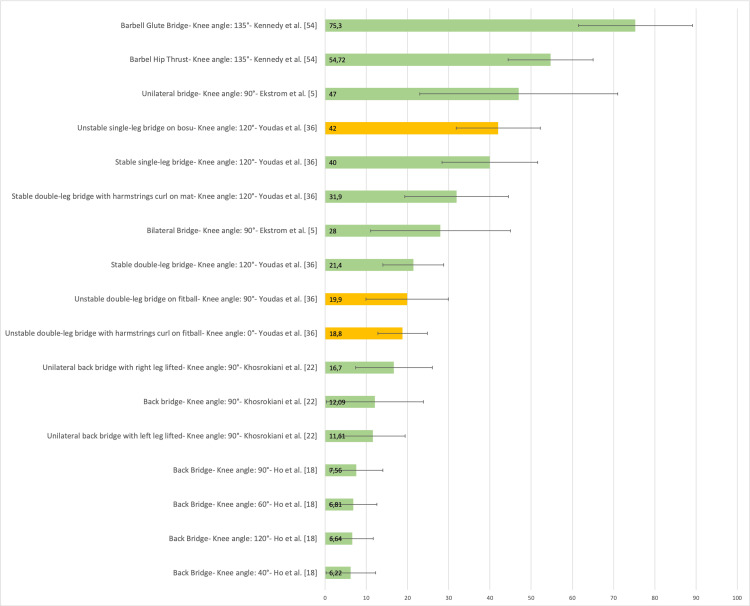
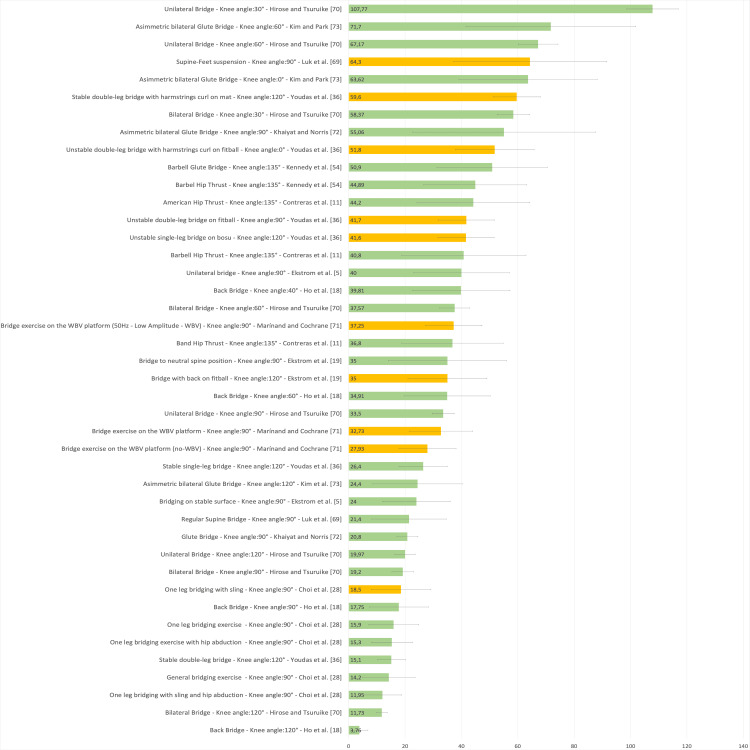
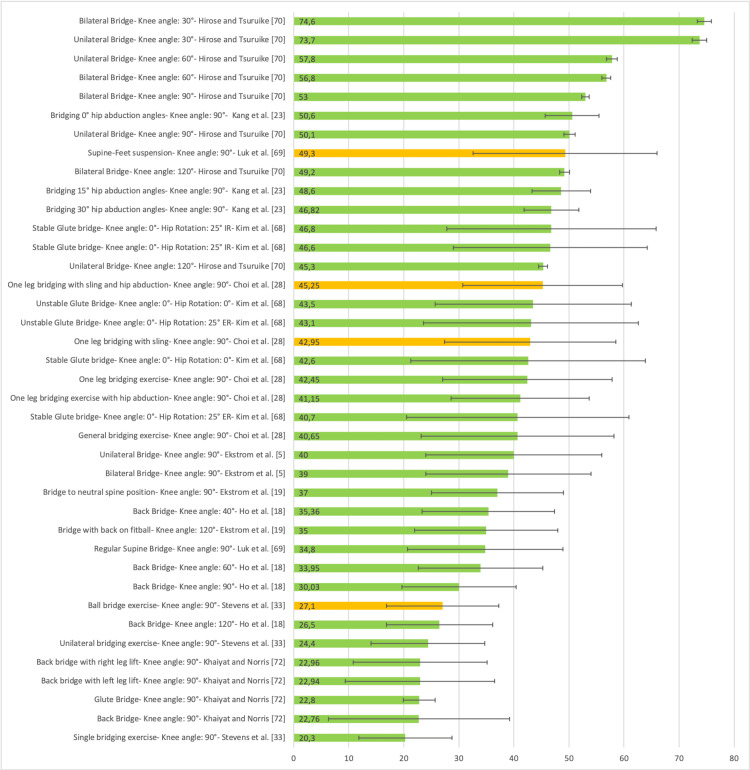
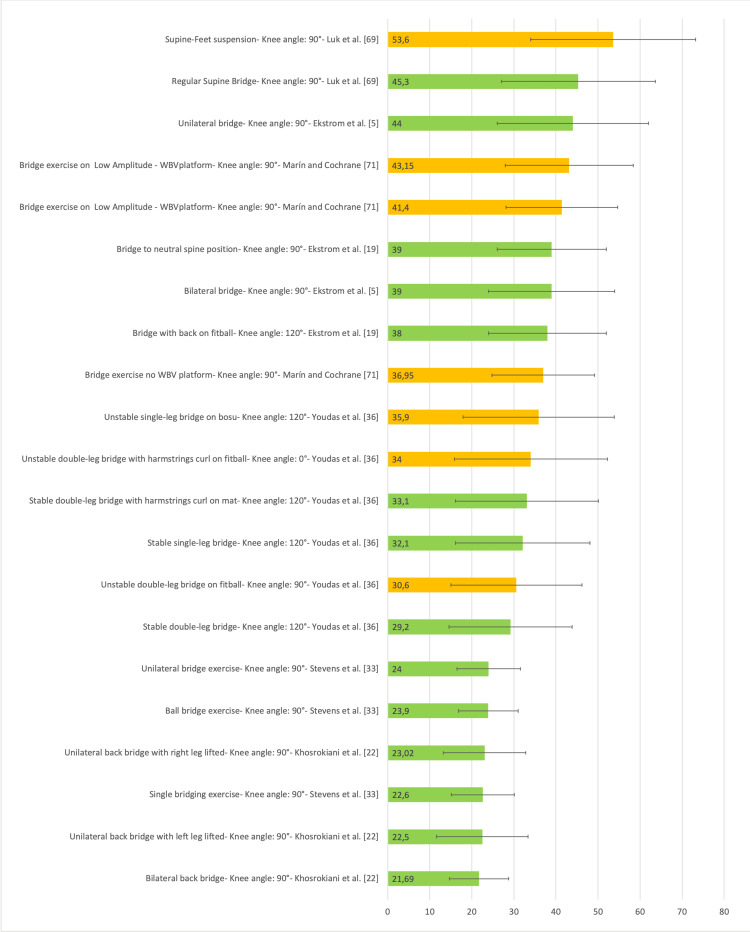
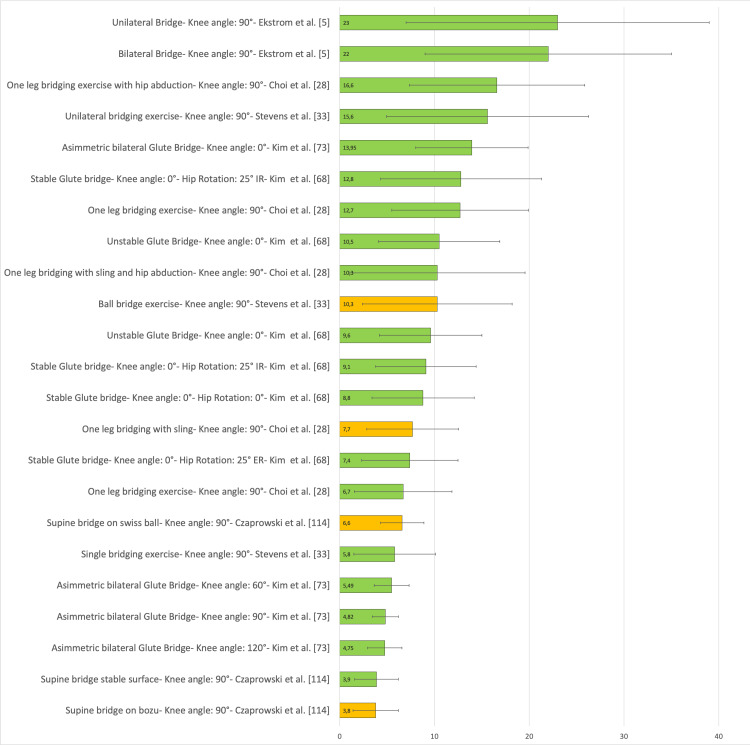
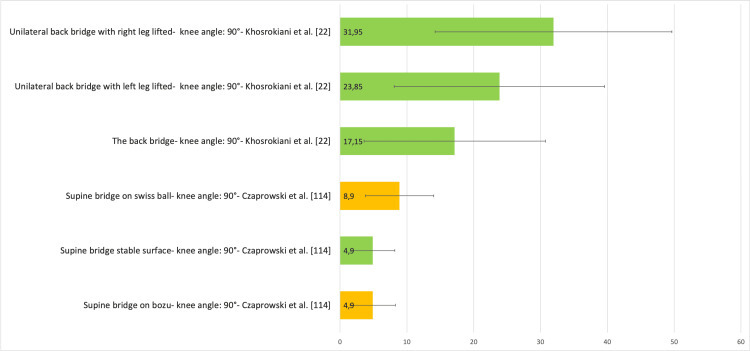
This article represents the first part of a larger work aimed at exploring the use of the supine bridge exercise (SBE) for both therapeutic and preventive purposes concerning lower back and hip joint pathologies, which will be presented in a subsequent article. The current article presents various execution modes of SBE found in the literature. It discusses what is involved in performing the traditional SBE with different angles at the ankle, knee, hip, and spine. It also addresses SBE variations, such as (1) single-leg; (2) with simultaneous activation of the hip adductors; (3) with simultaneous activation of the hip abductors; (4) with elevated upper trunk support; and (5) with foot-elevated support on a stable or unstable surface. Additionally, it reviews the literature on how different methods of performing the SBE engage muscles responsible for the stability of the hip, pelvis, and lumbar spine, including the gluteus maximus, gluteus medius, hamstrings, erector spinae, multifidus, transversus abdominis, and external oblique. The aim of this article is to serve as a practical guide or "manual" for utilizing SBE across a variety of rehabilitative contexts, providing insights into how the exercise can be adapted to target specific muscles effectively in different clinical scenarios.

Keywords: barbell glute bridge; barbell hip thrust; erector spinae; external oblique muscle; gluteus maximus muscle; gluteus medius; hamstring muscle; multifidus; supine bridge exercise.


Conflict of interest statement

Conflicts of interest: In compliance with the ICMJE uniform disclosure form, all authors declare the following: Payment/services info: All authors have declared that no financial support was received from any organization for the submitted work. Financial relationships: All authors have declared that they have no financial relationships at present or within the previous three years with any organizations that might have an interest in the submitted work. Other relationships: All authors have declared that there are no other relationships or activities that could appear to have influenced the submitted work.

Figures

Figure 1
Figure 1. Example of performing the classic supine bridge exercise
A) Starting position; B) End position. Image credit: Author Saverio Colonna
Figure 2
Figure 2. Biomechanical diagram of the supine bridge exercise
Mg: body weight vector applied at the center of body mass (C); R1: ground reaction vector at the foot level; R2: ground reaction vector at the dorsal contact point; α: angle at the tibio-tarsal level; β: angle at the knee level; φ: angle at the hip level; δ: angle between the trunk axis and the ground (trunk tilt); L: distance between the foot contact point and the dorsal contact point (thoraco-podalic distance). Adapted from Biscarini et al. [12]. Image credit: Author Saverio Colonna
Figure 3
Figure 3. Ankle dorsiflexion variation of the supine bridge exercise
A) Starting position; B) End position. Image credit: Author Saverio Colonna
Figure 4
Figure 4. Example of supine bridge exercise with different knee flexion angles
A) 60° starting position; B) 60° end position; C) 90° starting position; D) 90° end position; E) 120° starting position; F) 120° end position. Image credit: Author Saverio Colonna
Figure 5
Figure 5. Superior gluteus maximus/biceps femoris (SGM/BF) and inferior gluteus maximus/biceps femoris (IGM/BF) ratios
The graph shows how the SGM/BF and lGM/BF ratios (y-axis) change with varying knee flexion angles (x-axis). The data used to construct the histogram were taken from the work of Ho et al. [18]. Image credit: Author Saverio Colonna
Figure 6
Figure 6. Supine bridging exercise performed with different spinal angles
The upper limb was abducted only to better illustrate the difference in the pelvis-spine axis between the two modes of performing the end position of exercise: A) neutral and B) hyperextension. Image credit: Author Saverio Colonna
Figure 7
Figure 7. Execution of supine bridging exercise
A) Traditional; B) With the abdominal drawing-in maneuver. Image credit: Author Saverio Colonna
Figure 8
Figure 8. Examples of single-leg stance balance bridge exercises (SLB)
A) The limb suspended in line with the trunk; B) Hip and knee flexion; C) Hip flexion with the knee extended. Image credit: Author Saverio Colonna
Figure 9
Figure 9. Single-leg bridging on unstable surfaces like a BOSU (both sides utilized) ball
A) Starting position with both feet on the surface; B) End position with the suspended leg flexed at the hip and the knee extended, aligned with the spine; C) End position with the suspended leg flexed at both the hip and knee; D) End position with the suspended leg flexed at the hip and the knee extended, perpendicular to the ground. Image credit: Author Saverio Colonna
Figure 10
Figure 10. Bridging with the addition of adductor muscle activation using a ball
A) Starting position; B) End position, lateral view; C) End position, foot-level view. Image credit: Author Saverio Colonna
Figure 11
Figure 11. Bridging exercise with added activation of the abductor muscles using an elastic band
A) Starting position; B) End position, lateral view; C) End position, foot-level view. Image credit: Author Saverio Colonna
Figure 12
Figure 12. Barbell hip thrust with dorsal support on a bench
A) Starting position; B) End position. Image credit: Author Saverio Colonna
Figure 13
Figure 13. Barbell hip thrust with dorsal support on a Swiss ball
A) Starting position; B) End position. Image credit: Author Saverio Colonna
Figure 14
Figure 14. Barbell hip thrust
A) Starting position with the barbell; B) End position; C) Foot-level view of the final position. Image credit: Author Saverio Colonna
Figure 15
Figure 15. Supine bridging exercise with elevated foot support on a bench
A) Starting position; B) End position. Image credit: Author Saverio Colonna
Figure 16
Figure 16. Supine bridging exercise with elevated foot support on the Swiss ball
A) Starting position; B) End position. Image credit: Author Saverio Colonna
Figure 17
Figure 17. Supine bridging exercise with foot support in slings and extended knees
A) Starting position; B) End position. Image credit: Author Saverio Colonna
Figure 18
Figure 18. Supine bridging exercise with foot support on slings and flexed knees
A) Starting position; B) End position. Image credit: Author Saverio Colonna
Figure 19
Figure 19. Electromyographic activation of the gluteus maximus during different supine bridge exercise execution modalities proposed in the literature
Data are reported as a percentage of maximal voluntary isometric contractions with the corresponding standard deviation (error bars). The green bars represent supine bridge exercise (SBE) performed with cranial or caudal support on a stable surface, while the orange bars indicate that the execution is performed with one of the two support points on an unstable surface. Image credit: Author Saverio Colonna
Figure 20
Figure 20. Electromyographic activation of the gluteus medius during different supine bridge exercise execution modalities proposed in the literature
Data are reported as a percentage of maximal voluntary isometric contractions with the corresponding standard deviation (error bars). The green bars represent supine bridge exercise performed with cranial or caudal support on a stable surface, while the orange bars indicate that the execution is performed with one of the two support points on an unstable surface. Image credit: Author Saverio Colonna
Figure 21
Figure 21. Electromyographic activation of the hamstring during different supine bridge exercise execution modalities proposed in the literature
Data are reported as a percentage of maximal voluntary isometric contractions with the corresponding standard deviation (error bars). The green bars represent supine bridge exercise performed with cranial or caudal support on a stable surface, while the orange bars indicate that the execution is performed with one of the two support points on an unstable surface. Image credit: Author Saverio Colonna
Figure 22
Figure 22. Electromyographic activation of the erector spinae during different supine bridge exercise execution modalities proposed in the literature
Data are reported as a percentage of maximal voluntary isometric contractions with the corresponding standard deviation (error bars). The green bars represent supine bridge exercise performed with cranial and caudal support on a stable surface, while the orange bars indicate that the execution is performed with one of the two support points on an unstable surface. Image credit: Author Saverio Colonna
Figure 23
Figure 23. Electromyographic activation of the lumbar multifidus muscles during different supine bridge exercise execution modalities proposed in the literature
Data are reported as a percentage of maximum voluntary isometric contraction with the corresponding standard deviation (error bars). The green bars represent supine bridge exercise performed with cranial or caudal support on a stable surface, while the orange bars indicate that the execution is performed with one of the two support points on an unstable surface. Image credit: Author Saverio Colonna
Figure 24
Figure 24. Electromyographic activation of the external oblique during different supine bridge exercise execution modalities proposed in the literature
Data are reported as a percentage of maximum voluntary isometric contraction with the corresponding standard deviation (error bars). The green bars represent supine bridge exercise performed with cranial or caudal support on a stable surface, while the orange bars indicate that the execution is performed with one of the two support points on an unstable surface. Image credit: Author Saverio Colonna
Figure 25
Figure 25. Electromyographic activation of the transversus abdominis muscles during different supine bridge exercise execution modalities proposed in the literature
Data are reported as a percentage of maximum voluntary isometric contraction with the corresponding standard deviation (error bars). The green bars represent supine bridge exercise performed with cranial or caudal support on a stable surface, while the orange bars indicate that the execution is performed with one of the two support points on an unstable surface. Image credit: Author Saverio Colonna

Similar articles

Cited by

References

    1. The role of core stability in athletic function. Kibler WB, Press J, Sciascia A. Sports Med. 2006;36:189–198. - PubMed
    1. Electromyographical comparison of plank variations performed with and without instability devices. Snarr RL, Esco MR. J Strength Cond Res. 2014;28:3298–3305. - PubMed
    1. Sequential muscle activity and its functional role in the upper extremity and trunk during overarm throwing. Hirashima M, Kadota H, Sakurai S, Kudo K, Ohtsuki T. J Sports Sci. 2002;20:301–310. - PubMed
    1. Core muscle activation during Swiss ball and traditional abdominal exercises. Escamilla RF, Lewis C, Bell D, et al. J Orthop Sports Phys Ther. 2010;40:265–276. - PubMed
    1. Electromyographic analysis of core trunk, hip, and thigh muscles during 9 rehabilitation exercises. Ekstrom RA, Donatelli RA, Carp KC. J Orthop Sports Phys Ther. 2007;37:754–762. - PubMed

LinkOut - more resources